July 15, 2010

Food Friday Panzerotti

Labels: , ,

Panzerotti
Panzerotti

I have been itching to make panzerotti, fried pizza dough filled with cheese and tomatoes or ham, since the day I saw a travel show where people were eating them on the street in Italy, can't remember the city. They're like calzone but much smaller in size, and they are fried not baked. They're easy to make with store-bought pizza dough.

These are 5 inch thin dough rounds filled with cheese mixed with chopped tomatoes and pepperoni. The rounds are folded and sealed just like empanada then fried in hot oil until golden brown. They have to be eaten right away as they don't stay crispy.


food friday chiclet


July 14, 2010

Daring Cooks Nut Butters

Labels: , , , ,

Cold Soba and Vegetables with Cashew Butter Sauce
cold salad of buckwheat soba, spinach, sugar snap peas, and strips of nori with cashew butter sauce

The July 2010 Daring Cooks’ Challenge was hosted by Margie of More Please and Natashya of Living in the Kitchen with Puppies. They chose to challenge Daring Cooks to make their own nut butter from scratch, and use the nut butter in a recipe. Their sources include Better with Nut Butter by Cooking Light Magazine, Asian Noodles by Nina Simonds, and Food Network online.

Sorry for my seemingly never ending post but I went nuts with this challenge. I made 5 savory dishes and an easy sweet one using homemade nut butters. Nut butters are easy to make in a food processor, they are delicious and very healthy too.

First is one of the recipes given for this challenge, a noodle salad with cashew butter sauce. I omitted just one ingredient from the sauce (ginger), adjusted the seasonings to suit my taste, and added a few drops of sriracha sauce. The salad has cold Japanese buckwheat noodles, spinach, sugar snap peas, and strips of nori for a completely vegan dish. The mildly spicy cashew butter sauce is absolutely delicious with the cold noodle salad specially on a hot summer day.

Cold Buckwheat Noodle Salad
½ pound buckwheat soba, cooked and chilled on ice
blanched baby spinach, room temperature
precooked sugar snap peas, room temperature
cashew butter sauce
nori, cut into thin strips

cashew butter sauce
1 cup roasted unsalted cashews
2 cloves garlic, finely chopped
½ cup cashew butter
¼ cup soy sauce
2 tablespoons sugar
2 tablespoons vinegar
2 tablespoons toasted sesame oil
¼ cup water
1 teaspoon sea salt, or to taste
sriracha hot sauce, to taste

Cashew Butter Sauce
  • Make cashew butter: Grind cashews in food processor for about 2 minutes until smooth.
  • Prepare cashew dressing: Combine garlic, cashew butter, soy sauce, sugar, vinegar, sesame oil, and water in food processor. Process until smooth and garlic is completely pureed.
  • The dressing should be pourable, about the same thickness as cream. Adjust consistency to your liking by adding more water or cashew butter.
  • Add a few drops of sriracha hot sauce if desired. Taste and add salt if needed.
The second dish I prepared is Filipino tamales which I never had back when I was living in the Philippines, I don't know why. I have made a similar tamale recipe once, it was from another region in the Philippines and so I can say this is the first time I made this kind of tamale. Unlike the Mexican corn tamale, this is made with rice flour, peanut butter, and lots of coconut milk. They are wrapped in wilted banana leaves and steamed for hours. I love its peanuty and soft creamy texture.

Filipino Tamales

Tamale
Tamale

2 cups rice flour
7 cups coconut milk
1 cup brown sugar
1 teaspoon black pepper
salt to taste
¼ cup annatto seeds soaked in ¼ cup warm water
½ cup lightly toasted peanut butter
slices of hard boiled egg
boiled peanuts
cooked pork belly, sliced
cooked chicken breast, shredded
squares of banana leaves
  • Toast the rice flour in a large non-stick wok or Dutch oven until light brown.
  • Add the coconut milk, salt, sugar, and pepper and cook over low heat, stirring constantly. Add the peanut butter and stir cook for 10 minutes.
 Nut Butter
  • Divide this paste mixture into two parts leaving one part in the wok.
  • Strain the annatto, discard the seeds and add the colored water to the remaining mixture in the wok and continue cooking for 2 minutes longer.
  • Wrap the tamales: On three layers of banana leaves, put 3 tablespoons of the red mixture, then an equal amount of the white mixture, pat lightly to flatten, then arrange slices of pork or the shredded chicken, boiled peanut halves, and hard cooked eggs on top of mixture. Wrap each tamale and tie securely. Place the tamales in a steamer and steam for 2 hours.

I love Spanish tapas and one of the easiest to make is Albondigas, meat balls. After frying the meat balls they are usually simmered either in almond or tomato sauce.

Albondigas (Spanish Meatballs in Almond Sauce)

Albondigas with Almond Saffron Sauce

meat balls
1 pound minced pork or beef
1 small onion, finely minced
1 clove finely minced garlic
2 slices bread, crusts removed and soaked in milk
1 egg beaten
1 tablespoon finely minced parsley
dash of nutmeg
olive oil for frying
flour for dusting

sauce
¼ cup olive oil
1 slice bread
½ cup almond butter
½ cup white wine
1 clove minced garlic
1/8 teaspoon ground black pepper
¼ teaspoon ground clove
a pinch of saffron
1 cup chicken or vegetable stock
lemon juice
chopped parsley and toasted slivered almond for garnish
  • In a bowl combine all the ingredients for the meatballs and mix until well blended, then divide and shape into small walnut sized balls. Roll in flour and fry gently in hot oil until brown all over. Set aside and keep warm.
  • Prepare the sauce: Fry the bread and garlic in the oil until golden, then put into a food processor along with the almond butter, black pepper, saffron, clove, and white wine. Process to a smooth paste. Pour this into the same pan and add the stock, mix well and bring to the boil. Add the meatballs to the pan and simmer for 20 minutes.
  • Just before serving add a squeeze of lemon, a little chopped parsley and a few slivers of toasted almonds.
For my fourth nut butter dish, I processed dehydrated coconut flakes to a thin almost liquid consistency. I added some vegetable broth, salt, and lemon juice and drizzled the sauce on a dish of steamed oysters and sauteed vidalia onions seasoned with soy sauce, lemon juice, and 1 sliced red finger chili. It's very yummy.

Oysters with Coconut Butter Sauce
Coconut Butter


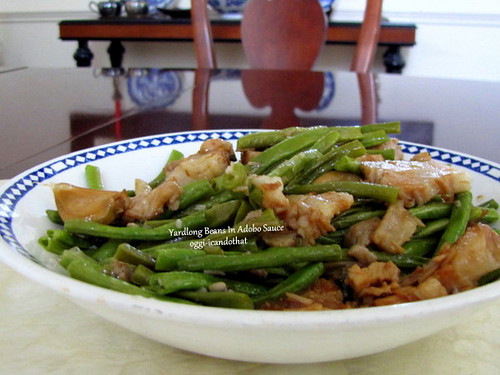
The last dish is also Filipino called Kare Kare, a meat stew colored with annatto seed oil. It has lots of peanut butter and an assortment of precooked vegetables and served with salty fermented shrimp fries called bagoong (bah-goh-ong). The usual vegetables are yardlong beans, banana blossoms, baby bokchoy, and Asian eggplant. I had some pig tails already boiled and stored in the freezer with the broth and made the peanut butter with medium dark roasted peanuts. My favorite Kare Kare is made with ox tail, recipe and photos here.

Pig Tail Kare Kare
pig tail kare kare

And I couldn't resist making something sweet out of peanut butter and chocolate chips. I mixed equal amounts of peanut butter and chocolate chips then added powdered sugar until crumbly but holds its shape. These are similar to candies in the Philippines called Choc*Nut.

ChocNut
ChocNut


Thank you Margie and Natashya for coming up with this surprisingly delicious and delightful challenge.:p

July 13, 2010

Mellow Bakers French Bread

Labels: , ,

French Bread
French Bread

When I started baking our bread more than 3 years ago, same day French baguettes were the first ones I made. They were not bad but also not any better than store-bought. With more experience and better recipes [with poolish or my favorite, BBA's Pain à l'Ancienne] I have become a baguette snob. And yet, I baked Jeffrey Hamelman's same day French baguettes from his excellent book BREAD, the second bread I chose to bake for this month's MellowBakers....just because....

French Bread

The bread is okay flavorwise, nothing to rave about, as expected. The loaves have a thin crispy-ish crust but don't have my obsession an open crumb. This recipe [which IMHO is out of place in the book reminds me of the Sesame Street song "One of these things is not like the others. One of these things just doesn't belong."] will be in the "do not make again" list. ^_^

French Bread

join us , we're meeelllooow
MellowBakers

July 11, 2010

Praline and Chocolate Pots de Crème

Labels: , , ,

Praline Pots de Creme

I found a recipe for pots de crème (a fancy term for pudding) with gianduja which sounds really good and one with praline paste which sounds even better. Praline paste is available from the stores but I made it at home with 4 ounces each of blanched and toasted whole almonds and hazelnuts stirred into 9 ounces of golden or darkish hot caramelized sugar; the praline was left to cool for 1 hour then broken into small pieces before processing into an oily paste. This makes about 2 cups of praline paste. The praline paste is delicious and I love to eat it by the spoonful straight from the jar.

Almond and Hazelnut Praline

Praline Pots de Crème
1 cup heavy cream
1 cup whole milk
¼ teaspoon salt
2 tablespoons granulated sugar
2 ounces milk chocolate
3 ounces bittersweet chocolate
7 ounces praline paste
4 egg yolks
  • Preheat the oven to 300°F.
  • Place four 6-ounce ramekins on a cookie sheet and set aside.
  • Place the milk chocolate, bittersweet chocolate, and praline paste in a mixing bowl with pouring lip and set aside.
  • In a small mixing bowl, break up the yolks with a fork. Set aside.
  • Combine the cream, milk, sugar, and salt in a medium sauce pan. Bring to a simmer over medium-high heat. Pour the mixture over the chocolates and praline paste. Using a whisk, gently mix the ingredients while occasionally scraping the sides of the bowl with a rubber spatula. Continue until the ingredients are fully incorporated. You may use an immersion blender for a finer texture but don't incorporate too much air. Add the egg yolks to the chocolate mixture and gently whisk until fully incorporated. Using a small strainer pour the liquid, filling the ramekins to the top.
  • Bake in a bain marie for about 50 minutes or until they are jiggly.
  • Let them cool for about 15 minutes on a rack, cover with plastic film, and refrigerate for up to 2 days. Enjoy them chilled or at room temperature.
The pudding is silky smooth and a bit runny but will firm up in the refrigerator.

Praline Pot de Creme
the yummiest smooth as silk nutty caramelly chocolaty pudding

July 8, 2010

Mellow Bakers 70% Rye with a Rye Soaker and Whole Wheat Flour

Labels: , , ,

Sourdough Rye Bread
cucumber open sandwich on thin slices of rye bread

This bread from Jeffrey Hamelman'sBREAD is one of three (or four) for this month's MellowBakers. The other two are Bialys and French Bread.

I was not too keen on sourdough rye maybe because I have never eaten an authentic rye bread. Most of the rye loaves I've had before were made with light rye flour and flavored with molasses and caraway seeds. I was also disappointed with The Bread Baker's Apprentice's sourdough rye bread which I considered one of the worst my least favorites.

I was surprised how flavorful Mr. Hamelman's rye bread is. It is tangy, moist, dense, chewy, nutty, smells reeeaaally good, and perfect for my favorite cucumber open sandwiches. I can now honestly say I know what rye bread tastes like and that I love it.

The sourdough bread recipe has medium rye flour, soaked rye chops, and a little whole wheat flour. I have some rye berries which I purchased when I was reading Daniel Leader's LOCAL BREADs but I never had a chance to use them. I "chopped" them using my burr coffee grinder which did an excellent job. I also soaked some in water and ended up chopping them by hand because they just swirled around in the food processor without getting chopped.

Rye Chops
chopped in a burr coffee grinder, soaked and hand chopped

The dough was very sticky and I don't know if it can be formed into a log as written. I just dumped the dough into the Pullman loaf pan sprinkled with rye flour. The aroma of the bread while baking made me want to slice it right away but the procedure says to wrap the loaf in baker's linen and leave for 24 hours.

Sourdough Rye with Soaker

July 6, 2010

Buttermilk Cheese

Labels:

Buttermilk Cheese

I purchased a quart of heavy cream and didn't notice the expiration date was the same day I got it. I used some of the cream for up to a few days after the expiry and the rest I made into butter. I added less than a quarter teaspoon of culture to the cream [the cream can also be churned into butter without] and beat it with a spiral beater on medium speed until the butter and buttermilk separate.

The thing I love about this process is I get to use not just the butter but also the buttermilk. The buttermilk is delicious either to drink, yes it's a bit tangy but it's yummy, or to add to biscuits and pancakes. It can also be made into delicious fresh white cheese by mixing with whole milk and boiling until curds form. The curds are spooned onto a sieve lined with round white coffee filter then weighted down. I keep the whey in the refrigerator and I use it for making bread or add it in certain dishes in place of regular tap water. See, no waste at all. I made three different goodies from a quart of heavy cream: butter, buttermilk, and cheese.

Buttermilk Cheese
1 quart whole milk
1½ cups low-fat cultured buttermilk
2 teaspoons kosher salt
  • Line a strainer with three layers of 12-inch cheesecloth squares and set over a deep bowl (if using the whey) or sink.
  • Combine ingredients in a large heavy-bottomed pot over medium-high heat and cook until mixture reaches 180°F and separates into white curds and translucent whey, about 8 minutes. Ladle contents into prepared strainer and drain completely.
  • Gather corners of cheesecloth together and gently twist to press out excess whey. Serve immediately, or cool to room temperature before serving, about 10 minutes.
  • For firmer consistency, transfer cheese on a small flat-bottomed plate lined with round white coffee filter. Shape into a rectangle or round, wrap the cheese with the coffee filter, weight down, let stand in refrigerator until cool, about 10 minutes. Unwrap and gently invert onto plate, discard paper, wrap in plastic film, and refrigerate for another 10 minutes before slicing.
Buttermilk Cheese
buttermilk cheese is non-melting and is delicious grilled or pan-fried

July 2, 2010

Food Friday: Pan de Sal Crescent Rolls

Labels: ,

Filipino Crescent Rolls

These soft sweet crescent rolls are called Spanish rolls in the Philippines. They have more eggs and are sweeter than regular pan de sal, almost as rich as ensaimada. Just like pan de sal they are rolled in very fine bread crumbs before baking making them uniquely Filipino. I filled the crescent shaped rolls with brown sugar and vanilla paste. So soft, so delicious specially when freshly baked and hot.


June 29, 2010

Yardlong Beans in Adobo Sauce

Labels: , , ,

Sitaw And Pork Belly Adobo

Here's a dish that has a dual personality, a bit healthy and a little bit un due to the fatty but yummy pork belly. The only vegetable I know that is cooked adobo style is the leafy green kangkong or water spinach but apparently among Filipinos, sitaw or yardlong beans is also cooked adobo style but flavored with pork belly.

I recently cooked adobo pork belly and there was one strip and lots of garlicky sauce left. I boiled the cut yardlong beans in salted water and finished cooking them with the sliced pork belly adobo and its sauce. The dish is so very yummy. I would like to think the unhealthy fatty pork is canceled out by the vegetable but I have my doubts.:p

Sitaw in Adobo Sauce
a 4-ounce piece of skin-on pork belly
½ cup coconut or cider vinegar
3 tablespoons soy sauce
½ teaspoon sea salt
6 cloves skin-on garlic
1/8 teaspoon whole black pepper
1 small bay leaf
1 cup water
2 cups yardlong beans, cut into 2-inch pieces
water
1 teaspoon sea salt
  • Put all the ingredients except the last 3 in a small saucepan. Turn heat to high and bring to a boil. Cover and simmer on medium-low heat for 45 minutes to 1 hour or until pork is tender. Add water if sauce is drying out. Taste and adjust seasoning.
  • Remove the pork, transfer onto a cutting board and let cool. When cool enough to handle, cut into thin slices. Transfer the sauce along with the pork in a bigger saucepan or wok. Turn heat to medium-low.
  • In another saucepan, place the cut beans, add enough water to cover and the salt. Boil until crisp tender. The beans should have bright green color. Drain and transfer into the saucepan. Turn up the heat to medium and simmer uncovered for 2 minutes, stirring to coat the beans with the sauce. Serve hot with steamed rice.

June 27, 2010

Daring Bakers Chocolate Pavlova

Labels: ,

Pavlova
pavlova with light chocolate meringue topped with dark chocolate mousse, kiwifruit, and candied mandarin oranges

The June 2010 Daring Bakers challenge was hosted by Dawn from Doable and Delicious. Dawn challenged the Daring Bakers to make Chocolate Pavlovas and Chocolate Mascarpone Mousse. The challenge recipe is based on a recipe from the book Chocolate Epiphany by Francois Payard.

I've seen recipes and photos of pavlovas but have never eaten nor tried to make them. I love meringues whether they are crispy, soft, or mixed with ground nuts and it was good to find out that the Daring Bakers are challenged to make pavlovas.

I changed the original recipe using just a quarter of the cocoa powder, omitted the confectioner's sugar, and baked it for a little over 1 hour which is half the recommended baking hours. The meringues came out crispy but still a little soft inside. I liked it. The recipe also calls for a mascarpone sauce that has 6 eggs yolks but I thought it was too rich. I'm sorry Dawn for not making the sauce this time. I will make it for another dessert because it sounds absolutely divine.

I made another one with slightly more chocolaty meringue but made a lighter mousse. I topped the cake with sliced mango and blueberries. This one has a more pillowy interior. I liked it too.

Chocolate Pavlova

This one is my favorite, a plain vanilla meringue shell topped with sweet strawberry halves and slightly sour sliced kiwifruit. I followed Audax's recipe which is very similar to the one in my British desserts cookbook. The shell has a crispy almost crackly exterior with soft marshmallow innards, is light as feather and has melt-in-your-mouth quality. Super-duper delicious!

Pavlova

Thanks Dawn for a thoroughly enjoyable challenge.:)

June 26, 2010

Whole Durum Pita

Labels: , ,

Pita
different sizes pita and green chickpea hummus
I've never made pita before. I usually buy the 3-inch whole wheat from Wegmans grocery store. They are very soft and are the perfect size for small sandwiches or for dipping in lemony hummus swimming in fruity extra virgin olive oil.

A few months ago I read about Jose Andres's teeny crispy air breads filled with some kind of creamy cheese and wrapped with thin slices of roast beef, his version of Philly Cheese Steak Sandwich. I don't know if the sandwiches are made with pita dough but the concept certainly inspired me to make pita. I used whole durum flour and made them into various sizes ranging from 3 to 5 inches, and a few ovals that are really tiny. It was fun to watch them balloon in the hot oven within a minute or two. It is even more fun to eat the soft bread with green chickpea hummus. Green chickpeas have a sort of grassy earthy flavor and whole durum pita's perfect partner!


Whole Wheat or Whole Durum Pita
2 cups whole wheat or whole durum flour
½ teaspoon instant yeast
½ teaspoon honey
¾ cup water
1 teaspoon kosher salt
  • In a small bowl, dissolve honey in water. In a medium bowl, mix ¾ cup of the flour and yeast then stir in the water and honey mixture. Cover with plastic wrap and let stand overnight or at least 4 hours until mixture is bubbly.
  • Sprinkle salt on top and mix in the rest of the flour. The dough should be stiff and slightly dry. Add more flour or water as needed. Knead by hand until smooth and elastic. Divide into 8 equal pieces or desired sizes and roll each into a ball. Cover with a moist towel or lightly oiled plastic film and let the balls rest for 1 hour on the kitchen counter.
  • Put a rack on the lowest position of the oven and place a pizza stone or an inverted sheet pan on the rack. Preheat the oven to 500°F.
  • Cut a few rectangular pieces of parchment and lay one piece on top of a peel.
  • Cut the sides and top of a gallon freezer bag. Open the bag and place a dough ball on the right side of the bag. Cover with the other side and flatten the dough balls into 6½-inch or ¼ inch thick rounds. [Tip: I use a small heavy skillet to flatten the dough to keep its rounded shape.] Place 4 pieces of flattened dough on the parchment and slide onto the hot sheet pan. Bake for 2 to 4 minutes or until completely puffed up. Remove with a spatula, transfer into a plate, and cover with a moist towel while baking the remaining dough. Enjoy while still warm.

June 24, 2010

Food Friday: Pizza

Labels: , ,

Pizza Napoletana
barbecue sauce, roasted garlic, flaked Thai chicken, chives, cilantro, and mozzarella


Pizza is one food that nobody doesn't like. It's probably the perfect food with the right toppings, of course. Having made pizzas from half a dozen dough recipes, including Neo-Neapolitan from Peter Reinhart's new book ARTISAN BREADS EVERY DAY, I am sticking with the one I think is the best for my preference in pizza dough, Peter Reinhart's Pizza Napoletana from the The Bread Baker's Apprentice. For this pizza dough recipe, there's a choice of high gluten flour, unbleached bread flour, and all-purpose. The high gluten and bread flours need a quarter cup of olive oil to tenderize the dough. I have always used unbleached all-purpose flour for this recipe and have gotten excellent results each and every time.

This is an unusual dough because it uses ice cold water and made to rest in the refrigerator overnight (or for up to 4 days). The dough is a bit slack but easy enough to handle. The finished pizza has all the qualities I love: thin crisp but tender chewy sweetish creamy crust with puffy crispy chewy edges. This pizza dough does not need a lot of toppings and I usually add homemade tomato paste, 2 kinds of cheeses, and small pieces of vegetables such as roasted peppers or baby artichokes. Peter divides the dough into small 6 ounce balls for easier handling. I make mine 8 ounces each and stretch them into 12-inch rounds.

For pizza and other rustic breads I use 6-inch unglazed quarry tiles that I purchased from Home Depot for 33 cents each. The tiles get really hot and seem to do a great job of searing the bottom better than a pizza stone. They are also conveniently mobile and can easily be moved from oven to the outdoor grill.

Peter's notes:
The dough does not need "lip", but one inevitably occurs because the edge is usually thicker than the center and it doesn't have any sauce to hold it down. Do not try to build up the edges by crimping because you want it to bubble up on its own and create a light, airy crumb.

Neapolitan-style Pizza
adapted from The Bread Baker's Apprentice by Peter Reinhart
4½ cups [20.25 ounces] unbleached all purpose flour, chilled
1¾ teaspoons salt
1 teaspoon instant yeast
1¾ cups [14 ounces] ice cold water (40°F)
2 tablespoons olive oil
6 zipper freezer bags
  • Sift together the flour, salt, and instant yeast in a 4-quart bowl of a standing mixer with the paddle attachment. Stir in the water until all the flour is absorbed, and mix for about 5 minutes. Switch to the dough hook and mix on medium speed for up to 7 minutes. The dough should clear the sides of the bowl but stick to the bottom of the bowl. If the dough is too wet and doesn't come off the sides, sprinkle in some more flour just until it clears the sides. If it clears the bottom, dribble in a teaspoon or two of cold water. The finished dough will be springy, elastic, and sticky, not just tacky, and registers 50° to 55°F.
  • Sprinkle flour on a work surface. Using a metal scraper, cut the dough into 6 equal pieces. Sprinkle the dough with a little flour and form into balls. Place the oil in a bowl and roll each ball in the oil and place in separate bags. Place the bags in the refrigerator for up to 4 days, or place some in the freezer for up to 3 months (transfer the frozen doughs in the refrigerator one day before you plan to bake them).
  • On the day you plan to make the pizza, remove the desired amount of dough balls from the refrigerator.
  • Dust the work surface and your hands with flour. Gently press the dough into flat disks about ½ inch thick and 5 inches in diameter. Sprinkle the dough with flour and cover loosely with plastic wrap. Let rest for 2 hours.
  • At least 45 minutes before baking, place a baking stone or unglazed quarry tiles on the lowest rack of the oven and preheat the oven to the highest heat setting.
  • Place a large sheet of parchment on your peel or generously dust with semolina flour. Make the pizza one at a time. Dip your hands including the back and knuckles in flour and gently lift one piece of dough with the help of a pastry scraper. Very gently lay the dough across your fists and carefully stretch it by bouncing the dough in a circular motion, giving it a stretch with each bounce. If it begins to stick, lay it down on the floured surface and reflour your hands, then continue shaping. If you are brave enough, toss the dough up in the air.
  • When the dough is stretched out to your satisfaction, lay it on the paper-lined or semolina dusted peel. Lightly top it with your toppings and slide the pizza, including parchment, on the stone and close the door. The pizza should take about 5 to 8 minutes to bake. Remove from oven and transfer to a cutting board. Wait 3 minutes before slicing and serving to allow the cheese to set slightly.
These are from last year's BBA Challenge:

 Neapolitan-style Pizza
tomato sauce, capers, mozzarella, feta, and kesong puti (Filipino fresh white cheese)

Blueberry Pizza
dessert pizza topped with fresh blueberries and coarse raw sugar

June 19, 2010

Kaya

Labels: ,


The first time I made kaya, the rich delicious Malaysian coconut egg jam, it was a semi FAIL but I loved it regardless. It is almost impossible for me to get the same color and texture by cooking it the traditional way unless I was willing to stir the whole day and night. So I altered the method to make it easier for me and for anyone who would like to try making the jam at home. I caramelized the sugar before adding the coconut milk and the tempered egg yolks. It still took about half an hour of stirring on low-medium heat to thicken the jam but it was worth it. I'm very happy the jam has a smooth texture, nice caramel color, and is of course very yummy specially on whole wheat toast.

Kaya on Whole Wheat Toast

Oggi's Coconut Egg Jam
2 fresh pandan leaves
¼ cup water
¾ cup sugar
1 can coconut milk
6 egg yolks
  • Cut the pandan leaves into 1-inch pieces and blend with the water on high in a blender. Strain using a coffee filter. Set aside.
  • In a large non-stick wok or saucepan caramelize the sugar over medium heat until golden to darkish brown. Carefully add the coconut milk and pandan water [it will bubble] and stir with a wooden spoon until the caramelized sugar has melted completely. Lower the heat to medium-low.
  • In a stand mixer bowl with the paddle attachment, beat the egg yolks until very thick. With the machine running, slowly pour 1 cup of the hot coconut milk mixture and beat on medium-high for 2 minutes.
Kaya
  • Stir in the tempered egg yolks to the coconut mixture. Cook, stirring constantly with a rubber spatula, until jam has thickened, about 30 minutes. Test the desired thickness by taking a half teaspoon and leaving in the refrigerator for 10 minutes.
  • Spoon jam into small jars, let cool, and store in the refrigerator.

June 17, 2010

Let's Make Macarons

Labels: , ,

A Trio of Macarons
rosewater puffs filled with lychee buttercream, coffee puffs filled with chestnuts buttercream, and matcha puffs filled with sweet azuki beans


As promised (comments section) here is the macaron tutorial of sorts from the book imacarons by Hisako Ogita. Making macarons is a seriously involved process but if you are willing to take the time, it's very rewarding to eat tiny puffy buttons.

Basic Vanilla Macaron Batter
adapted from i ♥ macarons
2/3 cup almond flour
1½ cups powdered sugar
3 large egg whites, room temperature
5 tablespoons granulated sugar
1 teaspoon vanilla extract
  • Cut a sheet of parchment paper to fit your baking sheet. Draw 1-inch circles ½ inch apart [use a water bottle cap as a guide]. Cut 2 more sheets of parchment paper but leave unmarked.
  • In a food processor, grind almond flour and powdered sugar together to a fine powder. Sift the mixture throuh a medium-mesh sieve twice. Set aside.
Macarons

  • In a standing mixer bowl, beat egg whites on high speed until frothy. Add the sugar 1 tablespoon at a time. Add vanilla and stir lightly. Beat meringue until stiff, firm, and glossy.
  • Add half of the sifted flour. Stir with a spatula while scooping it up from the bottom of the bowl. Add the rest of the flour and mix it lightly in a circular motion.
  • Macaronnage: Press and spread out the batter against the bowl's sides. Scoop the batter and turn it upside down (folding method). Repeat 15 times.
  • Macaronner: When the batter becomes nicely firm and drips slowly as you scoop it with a spatula, the mixture is done.
Macarons

  • Fill a disposable pastry bag with the batter and snip a .4-inch opening. Clip the top of the bag to prevent the batter from coming out.
  • Place the parchment with circles on the baking sheet. Place an unmarked parchment on top of the parchment. Pipe the batter using the circles as your guide. When full, carefully remove the parchment underneath. Rap the baking sheet firmly against the counter. This helps the macarons hold their rounded shape and helps the pied (little feet) to form. Repeat with the next baking sheet, parchment, and piping. You can fold and reuse the marked sheet which will save you time drawing circles. Leave the batter to dry on the kitchen counter for 15 to 30 minutes.
  • Preheat the oven to 375°F. Touch the batter lightly and if they do not stick to your fingers, they are ready. Bake 1 baking sheet at a time for 15 minutes. Remove from the oven and let cool on a wire rack. When completely cool, remove from the baking sheets. Fill with vanilla buttercream.
Macarons

Vanilla Buttercream
7 tablespoons unsalted butter, softened
3 tablespoons water
3 tablespoons sugar
1 egg
vanilla extract
  • In a small bowl, stir the butter with a spatula until creamy like mayonnaise.
  • In a small pan, boil the water and sugar to soft ball stage.
  • In the bowl of a standing mixer beat the egg lightly. Increase the speed to high and slowly pour the hot syrup. Reduce the speed to medium then to low and continue beating until the bowl has cooled down to the touch. Beat in the creamed butter in three additions. Add a drop or two of vanilla extract. Continue to beat until the mixture is thick and heavy. Pipe onto the macaron halves using a disposable pastry bag.
Coffee Macarons with Chestnut Cream Filling
coffee puffs filled with chestnuts buttercream

Matcha Macaron with Sweet Azuki Filling
Matcha Macaron
matcha puffs filled with sweet azuki beans

food friday chiclet

June 15, 2010

Milo Shake

Labels: , ,

Milo Shake

Milo toast has been my regular breakfast food since I wrote about it and I have yet to get tired of it. I soon will, don't worry, because I found another way to enjoy Milo and condensed milk: good old malted milk shake. It is the best drink to cool off this summer and I love to eat the crunchy Milo on top in between brain freeze sips of the shake.

The recipe is just a guide. You can add more or use less but why would you do that? Milo powder to suit your taste or use reduced fat milk, it's up to you. But most important, add a layer of Milo on top. It's delicious and satisfying. I promise you'll be purring like a cat. =^..^=

Milo Shake
6 tablespoons Milo malted powder
3 tablespoons cold sweetened condensed milk
2½ cups cold whole milk
3 tablespoons cold heavy cream
1½ cups ice cubes
Milo malted powder for topping
  • In a blender, blend on high all the ingredients, except the Milo for topping, until thick and frothy. Pour into 2 tall glasses. Top each glass with 2 tablespoons of Milo. Sit back and enjoy your shake.

 
Design by New WP Themes | Bloggerized by Lasantha - Premiumbloggertemplates.com