August 18, 2011

Food Friday: Batchoy

Labels: , ,

Batchoy

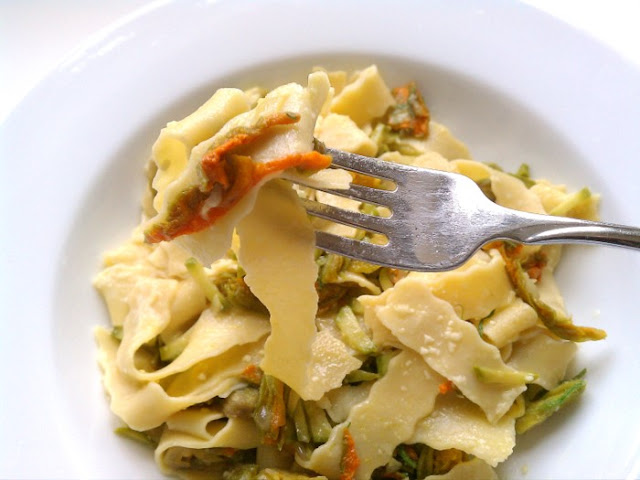
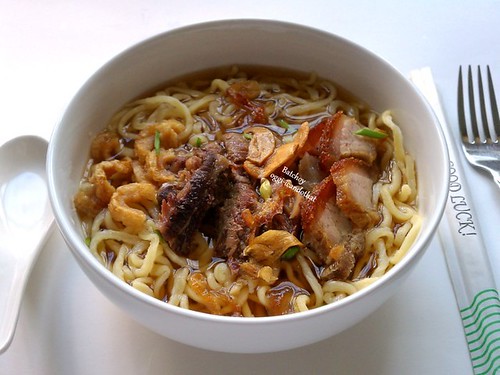
Luna Miranda's Food Friday entry last Friday inspired me to make batchoy which I haven't had for over 20 years and this is the first time I made the dish. I topped the egg noodle soup with strips of precooked beef, pork, chicharron, lechon kawali, fried shallots, fried garlic, chopped chives, and calamansi juice. Sarap!

Batchoy
fresh egg noodles
water
1 tablespoon olive oil
2 cloves garlic, finely minced
1 shallot, finely minced
4 cups clarified well seasoned beef and pork stock
sea salt, to taste
strips of cooked beef and pork, keep warm
chicharron strips
crispy fried shaved garlic
crispy fried shallots
chopped chives or scallions
calamansi or lemon juice
  • In a medium saucepan, heat the oil and saute garlic and onion over medium heat. Add stock, add salt if necessary, and let simmer on low heat until ready to use. Boil water in another saucepan and cook egg noodles. Portion noodles in individual bowls, top with desired toppings except calamansi, ladle hot stock to cover, and serve immediately with calamansi or lemon juice.

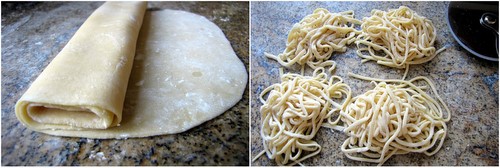
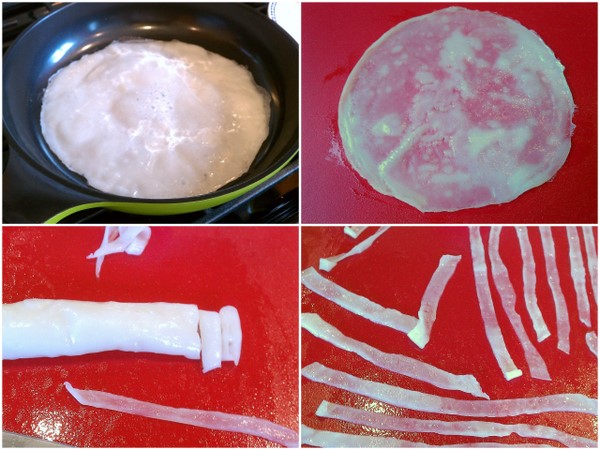
If you cannot find fresh miki (fat-ish egg noodles), it's easy to make and you don't really need a pasta machine although it helps a lot if you have one.
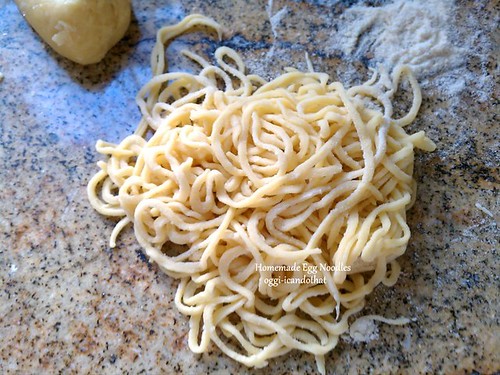
Homemade Egg Noodles

Egg Noodles

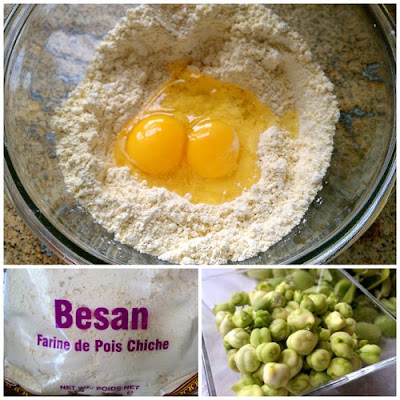
2¼ cups all-purpose flour plus extra for rolling
½ teaspoon baking soda
½ teaspoon fine sea salt
3 eggs
¼ cup light olive oil
  • In a medium bowl, whisk together flour, baking soda, and salt. Add eggs and oil and mix with a wooden spoon until combined. Transfer on kitchen counter and knead a few times until soft and smooth. Cover with plastic wrap and let rest for 20 minutes. Divide into 4 portions. Roll one portion into a 1/8-inch thick rectangle, about 16 inches long, dusting with flour if sticky. With a pizza cutter, cut into ¼ inch strips. Dust with flour to separate strips. Cook immediately or place on a lightly floured sheet pan while rolling and slicing the rest of the dough.

August 16, 2011

Capuchinos

Labels: , , ,

Capuchino


While browsing one of my Filipino cookbooks, RECIPES OF THE PHILIPPINES, compiled by Enriqueta David-Perez, I found these unfamiliar small cakes called Capuchinos. I have never heard of these tiny airy cakes made with lots of eggs. The cakes which are Spanish in origin are dipped for half a second in thin syrup before serving. I thought at first that they are coffee flavored because of the name. Researching online for its origin was frustrating. Entries for the cakes are scarce but I was able to find one or two articles and a recipe from a Miami (Cuban) restaurant. Both the cakes and capuccino coffee come from the Capuchin monk's habit; capuchino cakes from the pointed cowls and the coffee, its dark brown color and also the pointed cowl.  

Capuchino
light airy eggy capuchino and a cup of capuccino 


The recipe from the Filipino cookbook has flour, butter, sugar, and brandy and they are baked in small muffin cups which in my opinion is similar to chiffon cake or mamonalthough it has baking powder; the one from Miami has very little sugar and cornstarch added to the batter. I chose to make the one from Miami because I love airy light cakes. I made cones out of parchment paper and baked them on ice cream cone servers but these can be baked in lined muffin cups.

Capuchinos 1
cake
5 egg yolks
2 tablespoons sugar
2 teaspoons cornstarch
syrup

1 cup sugar
½ cup water
peel and juice of half a lemon
1 tablespoon brandy
1 teaspoon vanilla
  • Cakes: Pre-heat oven to 350°F. Beat egg yolks and sugar for 15 minutes until thick. Sift cornstarch over egg mixture and gently fold  until mixed. Transfer into a pastry bag, snip the tip of the bag and fill paper cones or paper liners 2/3 full. Bake for about 12 minutes or until tops are rounded and golden.When done, peel off the paper cones and pour syrup over them. 
  • SyrupPut sugar, water, lemon peel, and¼ teaspoon lemon juice to a boil. Boil for 3 minutes. Add brandy and vanilla. Cool completely before using.
Here is the recipe in its entirety from RECIPES OF THE PHILIPPINES. 

Capuchinos 2 
5 well-beaten eggs
1 cup sugar
½ cup melted fat
1 cup flour
¼ teaspoon salt
1 teaspoon baking powder
2 tablespoons brandy
  • Beat the eggs and sugar well. Add the melted fat then add the dry ingredients. Add brandy. Place in greased muffin pans and bake in hot oven. Before serving, dip in thin syrup for half a second. Set in a cool place to dry.

August 14, 2011

The Daring Cooks Make Appam

Labels: , ,

appam with crispy edges and slightly soft center

I added pigeon peas to the carrots recipe

Mary, who writes the delicious blog, Mary Mary Culinary was our August Daring Cooks’ host. Mary chose to show us how delicious South Indian cuisine is! She challenged us to make Appam and another South Indian/Sri Lankan dish to go with the warm flat bread.

******************************************************************************

Thanks Mary for challenging us to cook South Indian food. I rarely cook Indian food and never liked it in the past but in recent years, I have come to appreciate it and even bought a cookbook. I have cooked Kerala Chicken once and loved it but this is the first time I have heard of appam, a flat bread made with fermented rice paste and coconut milk and cooked in a small wok or skillet. The recipe for appam and dishes are here.

Initially, I didn't like its fermented flavor but the second batch I made which had less yeast and shorter fermentation period made delicious appams. I prepared a simple but yummy vegan dish to go with them, the recipe I adapted from here.

Appam
Fava Beans, Asparagus, and Potatoes with Grated Coconut

Fava Beans, Asparagus, and Potatoes with Grated Coconut 
½ cup grated fresh coconut
2 tablespoons toasted sesame seeds
1 piece dried red hot chile
1 tablespoon dried red lentil
2 teaspoons sea salt
1 tablespoon tamarind paste
1 cup peeled fava beans, half-cooked
1 cup asparagus, cut into 1 inch pieces
1 cup tiny potatoes, halved or quartered, half-cooked
1 cup water
1 tablespoon olive oil
½ teaspoon whole black mustard seeds
1 dried mild red chili, crumbled 
1 clove garlic, finely minced
6 fresh curry leaves, julienned
2 teaspoons powdered jaggery or raw sugar
  • In a small skillet, toast separately coconut, lentils, and chile. Put them in a blender together with the toasted sesame seeds and blend to a paste, adding a little water if needed. Place the blended mixture in a large skillet or small wok and saute for 3 to 4 minutes. Add the vegetables, tamarind paste, salt, and water; let boil, lower heat to medium low and simmer, covered, until potatoes and beans are tender and asparagus still crisp but tender. 
  • In another skillet, heat the oil and saute mustard seeds, dried chile, and garlic for 2 minutes. Add the curry leaves and sugar and cook for 1 minute. Stir into the vegetables; turn heat off and let rest for 10 minutes before serving with warm appams.
I also cooked the Sri Lankan Beef Curry provided by Mary but replaced the green chiles with hot reds. Do try this delicious dish.

Beef Curry On Appam
delicious beef curry and appam 

And for breakfast the other day, I added 4 tablespoons sugar to 1 cup of batter, and cooked them thicker than regular appams.. I added grated sharp cheddar on top for a sweet, salty, and coconut-y rice pancakes. I love it!

Sweet Appam
sweet appam for breakfast

August 11, 2011

Baked Mini Donuts

Labels: ,

Baked Mini Donuts


Food Friday

These 1½-inch baked yeast mini donuts and holes are delicious glazed, rolled in regular and icing sugars, or topped with chocolate frosting. They are a tad crispy and chewy, not as fluffy and soft like Krispy Kreme. All the recipes for the mini donut pan are baking powder cake donuts but I prefer using yeast for donuts. I just followed a recipe for regular donuts, cut the dough with donut hole cutter, then pressed them on the mini donut pan cavities. These are so cute, fun to eat, and satisfy my donut craving with just a few pieces.

Baked Donuts
2½ cups all-purpose flour
½ tablespoon instant yeast
2 tablespoons sugar
1/8 teaspoon ground nutmeg
¾ teaspoon kosher salt
4 ounces milk, scalded and cooled to 100°F
2 tablespoons soft butter
1 egg, room temperature

  • Whisk together flour, yeast, sugar, nutmeg, and salt in the bowl of a standing mixer. Add the rest of ingredients and mix with paddle attachment until combined. Knead on medium high with dough hook attachment until smooth and elastic. Transfer into a lightly greased container, cover with plastic wrap, and let ferment until doubled. Knead lightly; roll into ½ inch thick rectangle. Cut with donut hole cutter or 1-inch round cookie cutter. Press into the cavities of a mini donut pan until the dough goes through the middle creating a hole. Cover with plastic wrap and let rise for 30 to 40 minutes. Bake in a preheated 400° F oven for 12 minutes or until golden. Remove from pan and glaze or roll in powdered sugar if desired.


August 10, 2011

For The Love of Chili

Labels: ,

Chili

I went to a chili cook-off sponsored by our local Ashburn Pub last Saturday. 17 chili recipes entered the competition and the winner by popular votes from us tasters will have their chili recipe included in the pub's menu for a whole year. I tried only 7 chilis, 6 without beans and 1 with beans and sweet corn. The first one I tried  was terribly sweet, I tasted only a tiny portion and threw the rest away. Who puts sugar in their chili and who would eat and love it??? Well, as it turned out people here in Ashburn like their chili sweet and honeyed because it WON the competition. A friend of ours, Enrique who is originally from Venezuela, voted for it as the best, so what do I know. Anyway, the only chili I make and eat is Authentic Texas Border Chili and nothing else. 


it was crowded, hot, and noisy inside and outside the pub

Enrique with his drink Mongo Juice which he gave to me because it was too sweet for him. It's a non-alcoholic drink that tastes of nothing but chemicals, sugar, and probably a few drops of bitters. I drank it because it was cold and I liked the large slice of watermelon.

the creator of Mongo Juice
the staff calls him Mongo after the character in the movie Blazing Saddles 
although he is not really as huge as Mongo

my first choice had chunks of sausage and tasted almost like my favorite chili

my second choice, more like a stew but the only chili that actually had hot chiles

my third choice regardless of beans and corn
very tasty and it's served with delicious oyster crackers 

Our friend Enrique suggested I join next year and he will "pimp" for my chili but now that I know what the tasters prefer, my chili might come out at the very bottom because it's never sweet and has loads of spices.

August 4, 2011

Light Chocolate Cupcakes Topped with Sponge Candy

Labels: , , ,

Chocolate Cupcake with Raw Sugar Frosting
Chocolate Cupcake
light chocolate cupcakes with raw sugar frosting 
and topped with bits of sponge candy

Food Friday

It's been ages since I made chocolate cupcakes. I have small bits of sponge candy, also called honeycomb because of its open fluffy texture, and thought they would be great as topping for chocolate cupcakes. I wasn't in the mood for the too rich dark ones so I used natural cocoa powder for lighter but still chocolaty cakes. I love the crunch and extra sweetness of the sponge candy, perfect with the soft melt-in-your mouth cupcakes. If you prefer really dark moist rich cakes the recipe is here

Light Chocolate Cupcakes
2 cups all-purpose flour
½ cup natural cocoa powder (not Dutch processed)
1 teaspoon baking powder
½ teaspoon baking soda
¾ cup room temperature butter
1½ cups sugar
1 tablespoon vanilla extract
3 eggs, separated
1 cup ice-cold water
  • Line cupcake tins with baking papers. 
  • Preheat oven to 350°F. 
  • In a medium bowl, whisk together flour, cocoa powder, baking powder, and baking soda; set aside. 
  • In the bowl of a standing mixer with the paddle attachment, beat butter for 1 minute; add sugar and vanilla and beat on high until light and fluffy. Add egg yolks, one at a time, beating each time until just incorporated.
  • Add flour mixture alternately with water, beating until smooth. Transfer mixture into a bowl; set aside. 
  • Wash the bowl thoroughly. With wire whisk, beat egg whites until stiff and glossy. Mix a little of the egg whites into the flour mixture to lighten. Fold the rest of the egg whites into the flour mixture. Spoon about ¼ cup of dough into each cup. Bake for 15 to 20 minutes or until cake test is done. Cool completely before frosting.
Golden Raw Sugar Frosting
1 cup coarse golden raw sugar
1/3 cup water
1 tablespoon vanilla extract
2 egg whites
¼ teaspoon cream of tartar
  • In a small bowl, heat sugar and water until sugar dissolves. Bring to a boil until bubbly; turn heat off.
  • In the bowl of a standing mixer with wire beater, beat egg whites and cream of tartar to soft peaks; slowly add hot syrup while beating on high speed until frosting is thick and satiny.

July 30, 2011

Salmon Head Sinigang sa Bayabas

Labels: , , ,


Salmon Head Sinigang
salmon head, green tomatoes, and yardlong beans in guava broth

Sinigang, the Filipino soup which can be very sour or just slightly sour, is Kulinarya Cooking Club theme for this hot hot month of July. Initially, I was not too enthusiastic; first, because of the heat wave we are having here in the US East coast, and second, although I love sinigang and know by heart how to cook almost all sinigang recipes without using the packaged stuff, unfortunately my family doesn't care for it. After thinking if I should prepare sinigang or skip the challenge, I felt it's no big deal to sweat a little and made a small bowl for KCC and for me, of course, because the last time I had was in 2009 and before that was about 20 years ago. This is only the third time I've cooked sinigang.

Sinigang sa Bayabas (Soup in Guava Broth) was my favorite. My mom used to add a little bit of sugar and she didn't make it too sour either. Her choice of fish was usually milkfish or white kanduli (cream dory?), and occasionally she prepared the soup with thin strips of beef. What I like about sinigang is that I don't have to follow an exact recipe, I just put in whatever souring agent, meat, and vegetables I prefer and season it to suit my taste. I am so glad I made the soup because I really loved the combination of ripe guavas and salmon head, and the green tomatoes and sitaw straight from my garden made the soup a real treat. I had the soup spooned over a mound of hot steamed rice just the way I like. It was delicious and I didn't notice if I perspired while eating. ^_^

Salmon Head in Guava Broth
6 pieces medium size ripe Philippine guavas
4 cups water, divided
1 medium onion, coarsely chopped
4 green tomatoes, quartered
2 cups yardlong beans, cut into 2 inch pieces
2 tablespoons lemon juice, more or less to taste
1 tablespoon fish extract, plus extra for drizzling
salt to taste
2 tablespoons sugar, more or less to taste
1 salmon head, cut into serving pieces
2 hot green finger peppers
  • Cut each guava into 8 pieces. Place in a medium saucepan with 2 cups of water. Bring to a boil, cover, and let simmer for 30 minutes or until guavas are very soft and mushy. Strain and press as much pulp through a very fine sieve over a larger saucepan. Discard the seeds and guava pulp that remains in the sieve.
  • Add the rest of the water and onions to the saucepan and simmer, covered, for 10 minutes. Add the next 6 ingredients and gently boil for 5 minutes or until yardlong beans are half cooked. Add salmon head and green peppers; simmer, uncovered, for 3 to 4 minutes or until salmon is fully cooked. Serve over hot rice drizzled with fish extract, if desired.


Please visit the blogs of my fellow KCC members for delicious sinigang preparations. 

***********************************************************
KCC

Kulinarya was started by a group of Filipino foodies living in Sydney (Kath, Trisha, and Trissa), who are passionate about the Filipino culture and its colorful cuisine.

Each month we will showcase a new dish along with their family recipes. By sharing these recipes, we hope you find the same passion and love for Filipino Food as we do.

***********************************************************

July 29, 2011

Food Friday: Soft Mango Yogurt Ice Cream

Labels: , , ,

Mango Frozen Yogurt


The oppressive summer heat has been with us for a month now and I feel like melting whenever I step out of the house. What could be better than a cup of almost frozen tangy mango and yogurt dessert. [Okay, maybe a plunge in a pool of ice cold water would be a relief but iced desserts are good enough.] Anyway, I prefer this ice cream semi frozen because it retains its creaminess and doesn't give me brain freeze.:)

Semi Frozen Mango Yogurt Ice Cream
2 cups Greek-style yogurt
1 cup chopped fresh mango
4 to 6 tablespoons sugar
  • Blend all ingredients in a blender or food processor until smooth. Transfer into a container and place in the freezer for 30 minutes to 1 hour. Blend with a hand blender or in a blender and return to the freezer for another 30 to 45 minutes. Stir with a spatula and serve semi frozen. Or process in an ice cream maker and serve immediately. If you can't find Greek-style yogurt, strain regular yogurt in a strainer lined with a round coffee filter set on top of a bowl until yogurt is very thick.

July 27, 2011

Laminated Brioche

Labels: , ,

Laminated Brioche
Laminated Brioche
laminated brioche swirls filled with chopped candied figs

I've been eyeing Laminated Brioche since I bought ADVANCED BREAD AND PASTRY by Michel Suas but have been apprehensive I might fail. I finally baked them yesterday, the whole process took 2 days starting early morning the first day and finished baking late afternoon the second day. It actually takes 3 days but I'm impatient and I started reeeaaally early in the morning to be able to finish the next day.

It was a semi success as you can see from the crumb. There are layers visible but the honeycomb-like layers that I was expecting are missing. I'll surely make them again until I perfect the laminating process for a better looking layered crumb. The rolls are good enough for me at this time as they are delicious and not too rich; the crust is super flaky and the crumb is light, airy, and buttery but not greasy. The recipe surprisingly does not have much butter, only a total of 10½ ounces to 16 ounces of bread flour. For the butter block I followed another method because it makes the butter more pliable than just pounding on the sticks to flatten them.

Tip: For doughs with higher sugar content it's best to use the appropriate instant yeast such as SAF Gold. The dough will rise better when you use this type of yeast.

Laminated Brioche
adapted from ADVANCED BREAD AND PASTRY by Michel Suas

sponge
3 ounces bread flour
1/8 teaspoon instant yeast
2 ounces water
  • Mix all ingredients until smooth. Place in a container, cover with plastic wrap, and leave on the kitchen counter for 12 hours.
final dough
13 ounces bread flour
5 whole eggs
¾ ounce water
2 ounces sugar
1½ teaspoons kosher salt
2¼ teaspoons SAF Gold instant yeast
2½ ounces butter, room temperature
sponge
  • Mix all ingredients in a standing mixer with dough hook attachment. Knead on medium high for 10 minutes. Transfer into a lightly buttered container, cover with plastic wrap and lid, and leave on the kitchen counter for 1 hour. Retard in the refrigerator overnight or for 15 hours.
butter block
8 ounces cold butter
1 tablespoon all-purpose flour
  • Cut butter into ½ inch slices and place in the bowl of a standing mixer. Sprinkle the flour and beat on low with the paddle attachment until combined, scraping down the sides as needed. The butter should still be cold. Transfer the butter mixture onto a large piece of plastic wrap and shape into a 6-inch square. Refrigerate until needed. 
laminated brioche
final dough
butter block
all-purpose flour
chopped candied figs, dried currants and sugar, or almond cream
1 beaten egg
  • Dust the surface lightly with flour. Remove the dough from refrigerator and roll into a 12 x 6-inch rectangle. Place the butter block in the middle and bring both sides to the middle covering the butter entirely. Lightly tap the dough with a rolling pin starting from the center out and roll into a 16 x 9-inch rectangle. Fold 1/3 of the dough over 2/3 of the dough and fold the rest over like a letter. Wrap in plastic wrap and refrigerate for 30 to 45 minutes. Repeat 3 more times, resting in the refrigerator each time.
  • Roll out the dough into 16-inch wide and 1/8 inch thin rectangle. Brush one edge with water, 1 inch wide. Sprinkle with currants and dust lightly with sugar; or spread a thin layer of almond cream, leaving the part brushed with water. Roll from the unwatered side and cut into 1 inch wide strips. Place on parchment-lined sheet pans, tucking the outer end of the strip underneath the center of the swirl. Brush top and sides of swirls with egg wash, lightly cover with plastic wrap and leave to proof for 1½ to 2 hours preferably in a humid place. Brush top and sides of swirls a second time and bake in a preheated 400°F oven for 15 minutes or until golden brown all over.


The Daring Bakers: Le Fraisier

Labels: , ,

Le Fraisier
le Fraisier: 2 thin layers of genoise, a layer of strawberries, 
a layer of pastry cream, 
topped with almond paste decorated with circles of strawberry coulis 


Jana of Cherry Tea Cakes was our July Daring Bakers’ host and she challenged us to make Fresh Fraisiers inspired by recipes written by Elisabeth M. Prueitt and Chad Robertson in the beautiful cookbook Tartine.


You can download the recipe from here.

I love the cake a lot; the pastry cream is rich but seems so light and everything goes well together with the wonderful fresh strawberries, of course. Thanks Jana for a delectable and extremely gratifying challenge.

The inspiration for the design is as usual from my favorite baking book ADVANCED BREAD AND PASTRY by Michel Suas.

July 21, 2011

Food Friday: Crêpes with Bucayo

Labels: , , ,

Crepes with Toasted Coconut and Caramel Sauce
crêpes filled with bucayo 


Food Friday

I love crêpes, both sweet and savory. This time I wanted something sweet and Filipino. I filled them with bucayo, rolled them spring roll style, and drizzled with coconut sauce. They're sweet and coconut-y...perfect with ripe mangoes.

Recipes:

July 16, 2011

Korean Sesame Glutinous Buns

Labels: , ,

Korean Sesame Glutinous Buns

Have you ever cooked or baked something following the recipe from just drawings or pictures, sort of  a rebus baking/cooking. I bought a packet of Korean ready to bake mix glutinous buns with black sesame seeds. The packet doesn't have instructions in English, but at least the ingredients are written in English. I have guessed from the photo on the package that the buns may be tapioca flour because they look like pão de queijo. These sweet version of the buns are indeed made with tapioca starch, wheat flour, sugar, fat-free milk solids, and other ingredients. The buns are slightly sweet and salty, are crunchy on the outside with airy and chewy crumb. Really really really yummy. 

UntitledUntitled

From the illustrations and the corresponding amounts in grams and milliliter, it's easy to understand how much eggs and liquid to add, the weight of each bun, oven temperature, and how many minutes to bake the buns. Here is my "translation" based on the above:
  1. In a bowl, whisk together 60 grams of egg/s and 70 ml water [or maybe milk]
  2. Stir in one 250-gram packet of mix until fully combined.
  3. Divide dough into 40-gram pieces, [you'll have about 12 pieces] and place on a sheet pan. Spray with water.
  4. Bake in a preheated 180°C (356°F) oven for 30 to 40 minutes or until golden.  
There, that was easy. (^__^)

July 15, 2011

Food Friday: Chicken and Asparagus Sandwich

Labels: , ,


Food Friday

Chicken and Asparagus Sandwich is a family favorite for decades now, specially during the hot summer months. We usually open a can of asparagus but I now prefer steamed fresh. With a tablespoon or two of regular, not low-fat mayonnaise, and chunky cooked chicken breast, this sandwich always satisfies. Today for lunch, instead of baby dill pickles, I had it with strawberries dipped in sea salt. I love the sweet, slightly tart, and salty flavors with the sandwich. Yum!

July 14, 2011

The Daring Cooks: Homemade Noodles

Labels: , , , ,


ceci (chickpea flour) sagnarelli with zucchini blossoms, 
baby zucchini, and shaved Parmesan


Steph from Stephfood was our Daring Cooks' July hostess. Steph challenged us to make homemade noodles without the help of a motorized pasta machine. She provided us with recipes for Späzle and Fresh Egg Pasta as well as a few delicious sauces to pair our noodles with!

Click here for the noodle and sauce recipes.

************************************************************

Making noodles from scratch has always been an enjoyable activity for me. Thanks Steph for choosing homemade noodle for this month's challenge.

The one I made from the recipes given was the basic egg noodles. I made everything by hand because I don't have a pasta roller, and rolled as thin as possible which is surprisingly easy. Then I cut the noodles into thin strands using a pizza cutter. I sprinkled some flour on them, made the strands into nests while rolling the rest of the dough.
 
The noodles were boiled right away for a few minutes and mixed with stir-fried vegetables, grated ginger, rice wine, green onions, prawns, soy sauce, and sesame seed oil for a Chinese-style stir fried noodles. Delicious!

One of the noodle recipes I have wanted to make is the high protein ceci made with chickpea and all-purpose flour, eggs, and olive oil. These noodles are tender, nutritious, and yummy. I like them cut into 2 x ¾- inch strips called sagnarelli and simply served with vegetables sauteed in butter and sea salt then topped with Parmesan cheese; These are also good made into ravioli.

Chickpea Noodles
1¼ cups all-purpose flour
¾ cup fine chickpea flour
3 eggs
¼ cup olive oil
  • In a bowl, combine flours. Make a well in the center and add eggs and oil. Slowly mix in the flour until combined. Transfer on the counter and knead a few times until smooth. Wrap in plastic film and let rest on the kitchen counter for 1 hour before rolling into desired shapes.
fine chickpea flour, green chickpeas for ravioli filling
    I also love rice noodles specially the rice sticks from the Philippines but it may be impossible to find a recipe on how to make them from scratch. However, there are recipes for Chinese and Thai flat rice noodles which have rice flour, tapioca starch, and corn starch. I used a combination of 50% rice flour and 25% each for the remaining flour for a chewy but soft consistency. The noodles are very good with sauteed Chinese broccoli seasoned with oyster sauce, soy sauce, chopped chive, a little hot chili oil, and sesame seed oil. Most of the recipes I found online cook the noodles by steaming but I find it is a lot quicker to cook the crepes on an oiled non-stick skillet. After the crepe has cooled I sprayed some water to make it less sticky, then rolled and sliced them less than ½ inch thick for the pad Thai. They should be sliced into 1-inch thick pieces for other Chinese recipes.

    Flat Rice Noodles
    1 cup rice flour
    ½ cup tapioca starch
    ½ cup cornstarch
    ¼ teaspoon sea salt
    2½ cups water
    2 tablespoons vegetable oil plus more for oiling the skillet
    • Mix all ingredients in a bowl and let rest for 20 minutes. Heat a non-stick skillet over medium heat; brush with vegetable oil. Stir batter and pour about ¾ cup batter, swirling to completely cover the bottom of the skillet. Let cook until transparent. Loosen sides, invert onto a large plate and leave to cool.  Spray top with a little water, roll, and slice into desired thickness. Unroll and use immediately.
     

    What can I say about the buckwheat noodles...they're just okay and not worth the effort to make at home, in my opinion. But check out the pillow-soft Sweet Potato Gnocchi with Chestnuts and Sage and easy as pie Quark Spätzle I made a few years back.

    July 8, 2011

    Food Friday: Fun Sticks

    Labels: , , ,

    Fun Sticks
    buco-pandan barquillos and Oreo Funstix

    Food Friday

    Oreo has come up with its own barquillo snack called Funstix. The crunchy sticks are chocolatey, have a very thin layer of cream inside, and not too sweet. I love them! They're sooo good with iced milk just like my long time favorite, buco-pandan barquillos.

    July 6, 2011

    Asparagus and Eggs

    Labels: , ,


    I make this simple and easy to make dish often when asparagus is still in season and not too pricey. I sometimes bake it in individual bowls or just cook it in a covered skillet on the stove top to avoid heating up the kitchen. I love that it has more vegetables than meat which are added to flavor the sauce and the vegetables. The usual meat added are Spanish chorizos and ham; the other vegetables are sweet peas and roasted sweet red bell pepper. I omitted the peas and added baby limas instead for added protein. If you can't find or don't like chorizos, other sausages are okay to use with this poached eggs and asparagus dish, but you have to omit the Spanish paprika though and substitute it with regular sweet paprika.

    Asparagus and Eggs
    2 tablespoons olive oil
    1 cup chopped Vidalia or sweet onion
    2 cloved garlic, minced
    2 pieces Spanish chorizo, sliced
    1 cup cubed ham
    2 teaspoons sea salt
    ground black pepper, to taste
    1 teaspoon pimentón (Spanish paprika)
    1 pound asparagus, sliced into half inch pieces
    1 large tomato, chopped
    1 cup coarsely chopped roasted red bell pepper
    1 cup frozen sweet peas
    6 eggs
    1 tablespoon extra virgin olive oil
    • In a large non-stick skillet, heat olive oil and saute garlic and onion for 3 minutes; add chorizo, ham, salt, pepper, and pimentón. Let cook on medium heat for 2 minutes. Stir in asparagus, tomatoes, and roasted red bell pepper and let simmer uncovered for 3 minutes. Stir in sweet peas. Make 6 wells and place one egg on each well. Sprinkle a few grains of sea salt on the eggs. Cover and let simmer until eggs are set but yolks are still soft. Remove from heat and drizzle all over with extra virgin olive oil. Serve immediately.
      

    July 4, 2011

    Happy Fourth of July!

    Labels:

     
    Design by New WP Themes | Bloggerized by Lasantha - Premiumbloggertemplates.com