November 4, 2010

Pork Menudo Pie

Labels: ,

Pork Menudo Pie

I suddenly was craving for savory pie earlier today. I have pie dough already divided into very small disks in the refrigerator and with some leftover pork menudo, I baked a few small pies. Pork menudo and buttery crust, it's so good!

food friday chiclet

Pork Menudo
¼ cup extra virgin olive oil
1½ pounds pork, diced into ¼ inch pieces
4 cloves garlic, chopped
1 medium onion, chopped
1 red bell pepper, diced
2 teaspoons sea salt
ground black pepper
1 large tomato, diced
1 cup water or chicken broth
1 large potato, diced into ¼ inch pieces
½ cup diced pork liver, sauteed in 1 teaspoon oil, optional
1 cup frozen green peas
  • In a medium saucepan, heat olive oil, add garlic and onion, stir fry for 2 minutes. Add red bell pepper, and pork. Stir fry for 3 minutes. Add tomato, salt, black pepper, and water. Bring to a boil, cover and simmer for 30 minutes. Add potatoes, simmer for 5 minutes. Mixture should be thick and saucy. Add cooked pork liver, if using, and peas and cook 2 minutes until peas are heated through. Serve with rice, in pan de sal. Or bake them in flaky pie shells.

November 1, 2010

Red Anjou Pear Tart

Labels: , ,

Red Anjou Pear Tart
Red Anjou Pear Tart

Pears are not a favorite of mine but once in a while when I see a really interesting recipe using red anjou or Starkrimson pears I get easily seduced. It is hard to resist this pear tart and I have to admit I have fallen head over heels in love after one bite. The tart has the right amount of sweetness, the spices are not overwhelming, and the tender but not mushy pears are not gritty at all. What a wonderful fall dessert and just perfect for this year's Thanksgiving dinner.

Red Anjou Pears


Red Anjou Pear Tart
adapted from Vanilla-spiced Caramel and Pear Tart
November 2010 issue of bon appétit

crust

1 pound puff pastry, store-bought or homemade

pears
3 tablespoons unsalted butter
½ cup sugar
1 cinnamon stick
1 whole star anise
3 whole cloves
pinch of coarse kosher salt
half of a vanilla bean, split lengthwise
6 medium firm but ripe red Anjou pears, peeled, halved lengthwise, cored

filling

¼ cup unsalted butter
half of a cinnamon stick, broken in half
2 whole star anise
6 whole cloves
half of a vanilla bean, split lengthwise in half
4 tablespoons sugar
1 large egg
a pinch of coarse kosher salt
1 ½ tablespoons all purpose flour
1 egg white, beaten
  • Crust: Roll out pastry into a 12-inch round. Transfer pastry to a 10-inch springform pan, pressing pastry firmly onto bottom and 1 ½ inches up sides of pan. Cover with plastic film and freeze crust until firm, about 2 hours, or leave in the freezer overnight until ready to bake.
  • Pears: Melt butter in heavy large skillet over low heat. Add sugar, spices, and salt. Scrape the seeds from vanilla bean; add bean and seeds to the skillet. Increase heat to medium-high and cook, stirring until sugar melts and turns brown, about 3 minutes. Reduce heat to medium; add pears, rounded side down. Cook until pears are almost tender, turning and moving skillet around occasionally for even cooking, 10 to 15 minutes, depending on ripeness of pears. With a rubber spatula, carefully turn pears over and continue to cook until pears are very tender, about 10 minutes longer. Remove skillet from heat. Let the pears cool in skillet with the spices.
  • Filling: Melt butter in small saucepan over low heat. Scrape seeds and add to the skillet along with the bean. Add cinnamon, star anise, and cloves. Increase heat to medium; cook until butter is golden, about 3 minutes. Remove vanilla bean and spices from butter; discard. Whisk sugar, salt, and egg together in a medium bowl then whisk in flour. Gradually whisk in the browned butter into egg mixture.
  • Bake the tart: Position rack in center of oven; preheat to 400°F. Brush frozen crust with beaten egg white. Pour filling into crust; spread evenly over bottom of crust. Using a slotted spatula, remove pears from skillet, allowing excess syrup to drain back into skillet; reserve syrup. Arrange pears, rounded side up, atop filling. Bake for 1 hour or until crust is deep golden and filling is set and brown at the edges. Run a small knife around sides of pan to loosen the tart. Release pan sides. Transfer tart to a platter and let stand uncovered for a few minutes to cool slightly.
  • To serve: Just before serving, boil syrup in skillet until reduced to about 1/3 cup, 1 to 2 minutes. Discard spices. Drizzle syrup over pears. Serve tart slightly warm.
Red Anjou Pear Tart

October 29, 2010

Crusty Pandesal

Labels: , , ,

Hamdesal
hamdesal, ham and egg sandwich on crusty but soft pandesal

Sausage, Egg, and Cheese Pandesal
sausage Mcpandesal with egg and cheese


food friday chiclet


The recipe for these crusty but soft pandesal buns is adapted from the hamburger bun recipe in ADVANCED BREAD AND PASTRY by Michel Suas. It has a 12-hour pre-ferment which I thought would make the pandesal more flavorful. And they are specially with brown sugar glazed ham and moist omelet or breakfast sausage patties, egg, and a slice of sharp cheddar cheese.

Crusty Pandesal
adapted from Hamburger Buns
ADVANCED BREAD AND PASTRY by Michel Suas

sponge

4½ ounces bread flour
2 ¾ ounces water
1/8 teaspoon instant yeast
  • Mix all the ingredients in a bowl until well incorporated. Cover with plastic wrap and allow to ferment at room temperature (65 to 70°F) for 12 hours.
final dough
13 ¼ ounces unbleached all-purpose flour
8 ½ ounces water
1 1/8 teaspoons instant yeast
2 teaspoons kosher salt
1 ½ tablespoons sugar
1 ½ ounces soft butter
¼ cup milk powder
sponge
very fine bread crumbs
  • In the bowl of a standing mixer with the dough hook attachment, mix all the ingredients except bread crumbs on low until fully incorporated. Increase the speed to medium and knead for 5 to 6 minutes until a soft smooth dough forms.
  • Transfer into a container, cover with plastic wrap and let ferment on the kitchen counter for 45 minutes to 1 hour.
  • Knead lightly then divide and scale to 2 ounces. Cover and let rest for 30 minutes. Shape into ovals and flatten slightly. Dredge in bread crumbs and place on sheet pans 2 inches apart. Cover with plastic wrap, put the pans in food grade plastic bags to proof for 1 hour and 30 minutes.
  • Bake in a preheated 400°F oven for 10 minutes, lower the heat to 375°F and bake for another 10 to 15 minutes or until golden. Let cool on wire racks.

October 27, 2010

Pancake Puffs

Labels: , , , ,

Poffertjes
Poffertjes
yummy and fun to eat yeasted buckwheat mini pancake puffs

This pancake popper pan caught my eye not only because of the shape but also because it's made here in the good old USA by Nordic Ware. It's very rare nowadays to find kitchen tools with a mark that says "Made in the USA". While at the store trying to justify buying another cooking pan that might end up in the cupboard unused, I remembered the teeny buckwheat Dutch pancake puffs (poffertjes), the similar but slightly larger Danish apple pancake puffs (aebleskiver), and the Japanese octopus balls. Plus, I thought I could probably use it to fry perfectly round meatballs too. And so it went into my shopping cart.*Sigh*

Pancake Popper Pan

Poffertjes (Dutch Mini Pancake Puffs)
1 cup bread flour
1 cup buckwheat flour
1½ teaspoons instant yeast
½ teaspoon kosher salt
10 ounces warm whole milk
1 egg, beaten
2 tablespoons golden syrup
2 tablespoons melted butter
powdered sugar
butter

Poffertjes
  • Whisk together the flours in a large bowl. Add the yeast and salt and stir to mix. Add the milk slowly, stirring constantly, then add the syrup and beaten egg. Mix well. Cover with plastic wrap and leave on kitchen counter to rise for 45 minutes.
  • Heat poffertjes pan if you have one, or a skillet or griddle and brush with melted butter. Pour half a tablespoon, or 1 tablespoon for bigger cakes, of the batter and cook until the poffertjes become light brown and dry at the bottom. Turn them with a small fork to cook the other side (I used a tool for making/dipping chocolate candies).
  • Sprinkle generously with powdered sugar and put a small lump of butter on top. Enjoy while still warm.

Aebleskiver

Aebleskiver
slightly larger apple filled Danish pancake puffs

2 eggs
1 tablespoon sugar
¼ teaspoon salt
1 cup all-purpose flour
½ teaspoon baking powder
½ teaspoon baking soda
1 cup buttermilk
2 tablespoons melted butter
powdered sugar
diced apple
  • Beat egg yolks until light and fluffy, then add the sugar and salt.
  • Sift the flour with baking powder and baking soda, then add it to the egg mixture, alternating small amounts with the addition of the buttermilk, as you continue mixing.
  • Beat the egg whites until stiff, then gently fold them into the batter.
  • Heat the pancake popper pan. Brus each cavity with melted butter and drop batter into cups, filling each about 2/3 full. Place some apple in the center of each cavity.
  • Cook over medium heat until browned and crisp on bottom. Turn each cake with a fork to cook the other side. The aebleskiver is done when a toothpick, or cake tester, inserted in the center comes out clean.
  • Remove cakes from pan and sprinkle with powdered sugar, if desired. Best when served warm.

October 24, 2010

Fried Grouper with Sweet and Sour Sauce

Labels:

Fried Grouper with Sweet and Sour Sauce

Its was a pleasant surprise when I saw small-ish whole grouper at the grocery store. Grouper is usually sold already filleted from ginormous fish. I got the smallest one, although still very large at almost 3 pounds, and over a foot long. While at the store I was already imagining it deep fried on a bed of red and green peppers with sweet and sour sauce just like the ones in Hong Kong restaurants.

I couldn't decide if I should prepare it Chinese-style or Filipino escabeche. They are very similar, the cooking method and ingredients except for soy sauce are almost identical. I guess the Filipino escabeche is another fusion of Chinese and Spanish recipes and became a Filipino dish just like arroz caldo.

I chose to prepare the whole grouper Chinese-style because I haven't had this dish in a long long time. I realized I didn't have a pan big enough to accomodate the big fish; I used my wok which was large enough but I had to tilt the pan several times to fry the tail which didn't become crispy. No problem, the rest of the fish was crispy, perhaps not as crisp as the restaurant's but it's good enough for me. And besides the dish is sooo yummy.

Fried Grouper with Sweet and Sour Sauce
fish
1 whole grouper, gutted and cleaned
sea salt
ground white pepper
all purpose flour, optional
vegetable oil

sauce
1 clove garlic
3 large shallots
2-inch piece fresh ginger
1 green bell pepper
1 red bell pepper
1 tomato, cut into wedges, optional
1 tablespoon light olive oil
4 tablespoons sugar, more or less to taste
5 tablespoons cider vinegar
½ cup water
1 tablespoon soy sauce
1 teaspoon sea salt, or to taste
2 tablespoons cornstarch mixed with ¼ cup water.
  • Cut the garlic, shallots, ginger, and bell peppers into matchstick size pieces.
  • Heat 6 cups oil in a large pan or wok on medium high.
  • Pat dry the fish inside and out and make 3 slits across on both sides. Season inside and out with 1 teaspoon salt and half a teaspoon of white pepper. Dredge in flour, if desired; remove excess flour.
  • Deep fry until skin is crisp.
  • While fish is frying prepare the sauce. In a medium saucepan, heat the oil and saute the garlic, shallots, and ginger for 2 minutes. Add the rest of the ingredients except the cornstarch mixture. Simmer for 2 minutes, taste and adjust seasoning, then add the cornstarch mixture. Simmer until sauce is clear and has slightly thickened.
  • Transfer on a serving platter and place the cooked fish on top of the sauce. Serve immediately with steamed or Chinese-style fried rice.

October 22, 2010

Food Friday: McD's Angus Third Pounder with Bacon and Cheese Burger

Labels: , ,

McD's Angus Third Pounder Bacon Cheeseburger


I can't believe I ate the whole thing. McDonald's 100% Angus Third Pounder with Bacon and Cheese Burger: a third of a pound of juicy and flavorful Angus beef patty with a slice of cheese on the bottom and topped with mustard, ketchup, slices of crisp sweet red onion, pickles, 3 slices of crispy bacon, and another slice of cheese on a soft but sturdy 5-inch bun. Yummy!

food friday chiclet

October 17, 2010

Matcha Bread Rolls with Sweet Azuki

Labels: , , ,

Matcha Rolls with Sweet Azuki

I was given a packet of matcha powder, compliments of Obubu Tea, a Japanese matcha producer *Thank you Ian*. The tea arrived from Japan yesterday and today I baked a small batch of bread rolls filled with sweet azuki which is one of my favorite dessert pairings. Three things I love: the mellow but distinct matcha flavor which lingers in the mouth after eating the sweet-ish rolls, the sweet aroma that greeted me when I snipped open the package, and the bright green color indicating top quality. I highly recommend it.

I'm not a green tea expert but for the past 4 years I have been drinking green tea brewed from Japanese loose tea leaves. The Japanese matcha powder I have I use exclusively for making cakes, cookies, crepes, ice cream, candies, and bread. I think I drank it once but didn't like it; I prefer the brewed tea leaves. Now I know why, the very pale green matcha powder, although also from Japan, is probably old or not the best quality.

Matcha
Obubu Tea matcha has a much brighter green color

Matcha An Pan (Green Tea Bread Rolls with Sweet Azuki)
3½ cups all-purpose flour
2 teaspoons instant yeast
4 tablespoons sugar
1½ teaspoons kosher salt
4 tablespoons milk powder
1 tablespoon matcha powder
1¼ cups + 2 tablespoons lukewarm water
4 tablespoons soft butter
1 egg, room temperature
homemade or canned sweet azuki
  • In the bowl of a standing mixer with the paddle attachment, stir together 2 cups of the flour, yeast, sugar, salt, milk powder, and matcha. Add the water, butter, and egg and mix on low for 1 minute. Add the remaining flour and mix on low for 1 minute. Sprinkle with 1 tablespoon lukewarm water if the dough seems dry.
  • Replace the paddle with the dough hook and mix on second speed for 4 to 5 minutes or until dough is smooth and supple. Transfer into a lightly greased container, cover with plastic wrap and let ferment on the kitchen counter for 2 hours.
  • Transfer the dough on the work surface and knead lightly to release air bubbles. Scale the dough into 2½-ounce pieces, roll into rounds, cover with plastic wrap, and let rest for 20 minutes. Flatten the rounds into 5-inch circles. Using a 1-tablespoon ice cream scoop, scoop and drop azuki on the center of the circle. Gather the edges and pinch to close. Place on parchment-lined sheet pans, seam side down, 2 inches apart, and flatten each to about 1 inch thick. Cover with plastic wrap and let rise for 1 hour. Preheat oven to 350°F 20 minutes before baking. Bake for 20 to 25 minutes or until tops are light brown in color.

Matcha Rolls with Sweet Azuki
the cut roll looks like a butterfly or clover

Matcha Roll
I made a few plain rolls, so good with chocolate spread

October 15, 2010

Food Friday: Hallowe'en Treats

Labels: , ,


Only 16 more days before candy day...are you ready for Hallowe'en trick or treaters? One of the bags of candies is already open and so I opened another bag with the Milk Duds in it. One tiny box has 4 pieces, more than enough to satisfy my craving for chocolate covered chewy caramels.
food friday chiclet

October 13, 2010

Suman sa Morón

Labels: , , , , ,

Suman sa Moron
Suman sa Moron

This is the third time I made this kind of suman and unlike the previous two [inedible] suman sa moron, this recipe I adapted from here is the best and most probably the most authentic. I'm not from the Visayas region where this type of suman comes from and didn't have them back in the Philippines either. But I can honestly say this recipe makes the most delicious and very soft suman with a strong smoky chocolate flavor (from Antonio Pueo tablea) and this suman is now on our list of all-time favorite Filipino treats. I can't stop eating them; they're great as a snack and for breakfast with barako coffee or hot ginger tea.

Suman sa morón is a cigar-shaped two-toned rice cake made with both glutinous and regular rice flours cooked in coconut milk, sugar, chocolate, and peanuts, wrapped in banana leaves and steamed for an hour. The recipe has julienned cheddar cheese added to the chocolate portion but I omitted it. I don't know the exact amount of chocolate to substitute for the tablea if you can't find them in your area. You can start with 8 ounces of semi-sweet or dark chocolate and just eyeball the color and texture, taste the cooked paste, and adjust to your preference.

Suman sa Morón
½ cup glutinous rice flour
1½ cups regular rice flour
4 ounces whole milk
½ cup sugar
½ cup fine muscovado (raw) sugar, or more to taste
8 chocolate tablea, softened with 2 tablespoons hot water
¼ cup chopped roasted peanuts
1 teaspoon vanilla extract
2 cups coconut milk, divided
julienned cheddar cheese, optional
banana leaves, cut into 8 x 10-inch pieces
about 4 dozens 5-inch long kitchen strings
  • With a wire whisk, thoroughly mix the 2 types of flour and divide equally into two parts.
  • In a non-stick wok, place one part of the rice mixture, add the sugar, whole milk, and 1 cup coconut milk. Stir until blended and cook, constantly stirring, on medium heat until thick. It will be lumpy but will become smooth as it thickens. Transfer into a plate and let cool.
  • In the same wok, place the rest of the flour mixture and add the remaining one cup coconut milk, muscovado sugar, chocolate, vanilla extract, and peanuts. Mix well and cook over medium heat while constantly stirring. Turn off the heat when mixture starts becoming oily and is smooth. Transfer into a plate and set aside to cool.
  • Pass the banana leaves over stove flame to make them supple.
  • Take a heaping tablespoonful of the chocolate mixture and place on the banana leaf wrapper. Sprinkle a little cheese, if using, before rolling with the banana leaf covering the mixture and roll into a ¾ inch thick rope. Take a heaping tablespoonful of the plain milk mixture and do the same process. Place the two ropes side by side and roll to form a thicker rope with the two colors fused together.
  • Roll the banana leaf to wrap tightly and tie a string at both ends to secure.
Suman sa Moron
  • Repeat the process until all of the two mixtures have been rolled and wrapped.
  • Steam in rapidly boiling water for 1 hour.

Suman sa Moron
best eaten when hot with a cup or two of strong barako coffee


KCC

Kulinarya was started by a group of Filipino foodies living in Sydney, who are passionate about the Filipino culture and its colourful cuisine. Each month we will showcase a new dish along with their family recipes. By sharing these recipes, we hope you find the same passion and love for Filipino Food as we do.

Suman, October's theme, is hosted by Sheryl http://crispywaffle.com/ and Divina http://www.sense-serendipity.com/

October 10, 2010

Chocolate Nougat

Labels: , ,

Chocolate Nougat

I've been busy studying reading the most comprehensive and engrossing non-fiction book I have ever owned, ADVANCED BREAD AND PASTRY by Michel Suas. I kid you not, browsing through the book feels like I'm a student reading a textbook and preparing for an exam because it's meant to teach. The book is divided into 4 categories and 22 chapters, 942 pages in all with additional 87 pages for conversions, baker's percentages, temperature conversions, glossary, references, formula index, and subject index.

These are the 4 categories:
Part 1: Introduction, 43 pages, a chapter on historical perspective and current opportunities on bread and pastry and a second chapter on food safety and sanitation in the bakery, which are all must-read.
Part 2: Bread, 251 pages
Part 3: Viennoisserie, 93 pages
Part 4: Pastry, 591 pages

At the start of each chapter are objectives and brief introduction or history and at the end of every chapter a summary, key terms, and review questions.
example:
Part 4, Chapter 18 Petit Fours and Confections
Objectives
After reading this chapter, you should be able to
  • define the classical categories of petit fours and the characteristics of the items.
  • describe the contemporary categories of petit fours and to be able to make a selection of them.
  • define the properties of saturated and super saturated sugar solutions and to be able to make them successfully.
  • make a selection of sugar confections including crystalline, noncrystalline, aerated, and jelly.
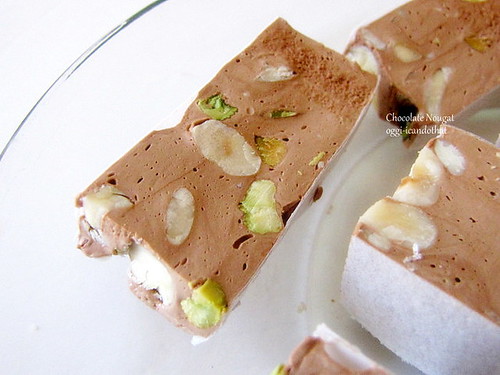
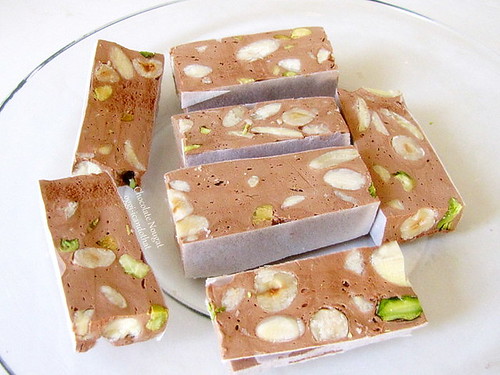
While I'm not a newcomer to candy making, I'm not an expert either and this book will probably make me one after I am finished reading it and if/when I'm done making all of the formulas which might take forever. The first I made from Part 4 Chapter 18 is Chocolate Nougat because I've never had chocolate nougat before. The chocolate in the recipe is called chocolate liquor which should not to be confused with chocolate liqueur. The glossary section defines it as "the product of the whole cocoa bean after it has gone through the initial production process and can be turned into cocoa powder and cocoa butter, can be sold as unsweetened chocolate, or can be further processed into dark or milk chocolate".

Glucose is available at candy/cake supply shops or you can get Wilton's but this brand is 3x more expensive. I used Ghirardelli 100% Cacao Unsweetened Baking bar. The candies came out perfect, not too hard nor too soft, have the right amount of sweetness and crunch from the nuts, and the chocolate flavor is rich without being overpowering. I love it!

Chocolate Nougat
adapted from ADVANCED BREAD AND PASTRY by Michel Suas
1 pound ½ ounce sugar
3¼ ounces glucose
5 ounces water
10 ounces honey
2 ounces egg whites
¾ ounce sugar
3½ ounces chocolate liquor
5½ ounces blanched hazelnuts
7 ounces blanched whole almonds
2½ ounces pistachios
2 sheets 8 x 11-inch rice or potato paper
  • Line the bottom of an 8 x 11-inch pan (or metal frame if you have one) with a sheet of rice paper.
  • Toast the hazelnuts and almonds in a 275°F oven until golden. Turn heat down to warm (100°F), add pistachios and keep them in the oven until needed.
  • In a medium heavy bottomed stainless steel pan, cook the first sugar, glucose, and water to 302°F. When the sugar mixture reaches 248°F, start cooking the honey (in a small stainless steel pan). Cook the honey to 266°F.
  • Using the whisk attachment, whip the egg whites with the ¾ ounce sugar. Slowly pour the honey onto the whipping egg white. Switch to the paddle attachment and add the hot sugar syrup.
  • When full volume is reached, add the melted chocolate and mix until blended. Add the warm nuts and mix until incorporated.
  • Transfer into the lined pan and smooth out if necessary with a buttered rubber scraper. Press the second paper on top of the nougat. Leave on the kitchen counter to set. When nougat has cooled, cut into desired sizes.

Chocolate Nougat


Chocolate Nougat


My next project from the book is Laminated Brioche. I can't wait to make and share them with my readers.:-)

October 7, 2010

Food Friday Sautéed Vegetables

Labels: , , ,


Sitaw Saute

green and purple yardlong beans, cherry tomatoes, and edamame beans

food friday chiclet

End of season vegetables from my garden: green and purple sitaw, cherry tomatoes, and edamame. I sautéed them in garlic, shallots, fermented anchovies (bagoong monamon), and a little chopped crispy pork rinds (chicharrones). Simply delicious.

October 5, 2010

Baked Empanada Kaliskis

Labels: ,

Empanada Kaliskis
Empanada Kaliskis

Empanada kaliskis (fish scales) has been in my 'to make list' for as long as I can remember but even after getting a recipe with the procedure on how to make the layered dough (thanks again to Maricel) I was still hesitant because of the work involved and the dreaded deep-frying. A reader renewed my interest when he suggested making the Italian sweet pastry sfogliatelle into a savory one just like empanada. After reading both recipes and the one from Malta, pastizzi, which are all remarkably similar, I tested a small batch. Although I wasn't 100% successful in rolling the dough paper-thin and the empanadas don't have the thin layers of these ones, I still think it is worthwhile because they came out flaky, tender, and delicious.

How to Make Empanada Kaliskis Dough
5 cups all purpose flour
1 cup cold lard or butter, diced
1 tablespoon rock sea salt
1 cup water
4 tablespoons sugar, more or less to taste
3 egg yolks
filling of choice

The following is Maricel's complete procedure for mixing and shaping the empanadas. The thickness of the slices is not specified; 1-inch thick is okay. I didn't soak the slices in oil, I brushed the dough with melted lard, sfogliatelle style, before rolling into a log. I baked the empanads in a 400°F oven for 40 minutes, brushing them with melted lard every 10 minutes to open up the layers.
Cut in lard to flour until cornmeal in texture. Dissolve salt, sugar and egg yolks in water. Add to flour. Knead until smooth, adding up to ½ cup of flour if dough is sticky. Let rest 10 minutes. Using a rolling pin or pasta maker, roll until dough is paper thin. Roll jellyroll fashion around a piece of fresh coconut tingting until desired diameter is reached (bigger diameter for bigger empanadas). Be sure to roll tightly. Pull out tingting. Cut into crosswise slices. Soak in oil for 30 minutes. Roll out each slice on a piece of banana leaf using a center-out, center-out motion until circle widens. Invert onto another piece of banana leaf. Roll dough trimmings thinly. Put trimmings on top of inverted rolled, oiled dough. Add filling. Fold in half. Seal edges by twisting and turning. Deep fry in hot oil. Flush with oil to make scales open.

Empanada Kaliskis
filled with flaked chicken pork adobo

September 30, 2010

Italian Sunday Gravy

Labels: , ,

Italian Sunday Gravy


I don't watch much TV these days but when I do, it's some cooking show or contest. I always catch just the last part of Cook's Country episode on Italian Sunday gravy. I got curious as to why it's called gravy and not tomato sauce. After a lot of web searching I found one recipe that has pigs feet and immediately forgot why I was searching for it. Of course, with the pigs feet how can I resist so I made a very small quantity combining the Cook's Country version and the recipe from one of Serious Eats readers. This is one delicious tomato sauce and I love the soft gelatinous skin and meat of the pigs feet. One serving with some, okay lots of meat, over a cup of whole grain penne for lunch was so filling I had to skip dinner.

September 27, 2010

Pain Meunier

Labels: , , , ,

Pain Meunier
Pain Meunier


Oh boy, I bought yet another baking book and I promise this would be the last, really...for the rest of the year. The book is called ADVANCED BREAD AND PASTRY A Professional Approach by Michel Suas. It's a big and heavy book with lots of beautiful photos and recipes for yeasted and quick breads, cakes, pastries, candies, fondants, and all sorts of confectionery. The book is definitely not for beginners but I recommend it to someone who is thinking of starting a baking business. Although I have been baking breads, cakes, and pastries for years now, it will take me many more to make them as professional looking as the ones in the book. Maybe I'll just read, learn a little, and admire the photos...or bake some of the yeasted breads that look and sound good. Like Pain Muenier or Miller's bread. This delicious and nutritious bread has all the components of the wheat kernel: bread flour, whole wheat flour, cracked wheat, and wheat germ. It's easy to make too, nothing too complicated or time consuming.

Pain Meunier history and a recipe that's almost identical to the book's is here.

Shaping Fendu
shaping fendu: make a thin 1½-inch indentation down the center of the batard, then fold one side into the center


September 23, 2010

Five-Spice Crispy-Skin Chicken

Labels: , , , , ,

Crispy Baked Chicken
crispy-skin baked chicken seasoned with 5-spice powder and honey

food friday chiclet


The original plan was to deep-fry a whole chicken but I decided on baked chicken halves instead because I'm not too keen on deep-frying. The recipe is from my ancient Wei Chuan's Chinese Cuisine cookbook by Huang Su-Huei which is my favorite of all my Chinese cookbooks. The recipes in this book are simple, authentic, and delicious.

Perhaps I deviated too much from the recipe, the result may not be representative of the book's recipe. The skin came out crispy enough but probably not as crispy as deep-fried. But the flavor and aroma of the chicken are fantastic and the meat so moist. The 5-spice powder, honey, rice wine, and vinegar all go well together. I like it a lot. It's finger lickin' good.

Crispy-Skin Chicken
adapted from Wei Chuan's Chinese Cuisine by Huang Su-Huei

1 whole chicken, about 3 pounds
2 tablespoons fine sea salt
1 teaspoon five-spice powder
2 tablespoons honey
3 tablespoons hot water
1 tablespoon vinegar
1 tablespoon rice wine
1 teaspoon cornstarch
about 10 cups oil for deep-frying
  • Rinse and pat dry the chicken.
  • In a small skillet heat salt over low heat until very hot. Remove from heat and stir in the five-spice powder. Let cool then rub half of the mixture into the cavity of the chicken. Reserve the other half to serve with the cooked chicken.
  • In a small skillet heat the rest of the ingredients except oil until honey is dissolved. Baste the chicken with half of the mixture until completely coated. Reserve the remaining honey mixture and keep in the refrigerator.
  • Place the chicken on a rack set on a baking sheet pan and refrigerate uncovered for 2 days, basting with the remaining honey mixture, until the skin appears dry (the book says to hang outside to dry for 8 hours or use an electric fan indoors).
  • Heat oil in a deep pot or fryer and fry chicken over low heat for 30 minutes. Turn the heat to high and fry for 2 minutes more or until golden brown. Remove from oil and drain on paper towels. Cut into serving portions. Serve with lemon wedges and the remaining 5-spice salt.
My chicken obviously does not have cavity. I rubbed the 5-spice salt on the meat under the skin and all over the exposed meat. It has just the right amount of salt and the skin has a hint of sweetness from the honey. To bake: Preheat oven to 325° F. Bake on a metal rack set on a roasting pan until golden brown and juices run clear. Chicken halves: 1 hour; whole chicken: 1½ to 1¾ hours.

September 20, 2010

Thou Shalt Not Steal (Blog Posts and Photos)

Labels: , ,

Maja Blanca
A concerned reader alerted me that one of my entries, Maja Blanca, appears word for word complete with one of my photos without attribution to me or to KULINARYA guidebook, on a facebook page of a pretend chef. He purposely didn't link his page to mine and omitted KULINARYA to make it look like he "created" the recipe and cooked it himself, the title of his post is maja blanca, my way. I was told that at least 5 more of his food posts on his facebook pages were directly lifted from other people's blogs and had the audacity of putting a watermark on a photo that he swiped from those blogs. What a loser and a fraud!

September 15, 2010

Marshmallows

Labels: , , ,

Raspberry Marshmallows
homemade marshmallows with raspberry puree

Lemon Marshmallows
sour and sweet lemon marshmallows

I made marshmallows yesterday and today using a recipe that doesn't have egg whites. I have a carton of raspberries, pureed them and used it instead of water to soften the gelatin powder. The fruit is naturally tart and cuts the sweetness of these melt-in-your-mouth marshmallows. These homemade candies are superior to the one from the stores. They're so light and fluffy and I was so pleased with the result I made a second batch using fresh lemon juice because I love Super Lemon, the pucker-inducing deliciously sour and sweet hard candies from Japan. The marshmallows are sour enough but I'd like to coat it with the super sour powder similar to the hard candy's if I can figure out where to buy it.

Marshmallows
2 envelopes unflavored gelatin
3 ounces water, fruit juice, or fruit puree
1 tablespoon vanilla extract
1 ½ cups sugar
3 ounces water
5 ounces light corn syrup
¼ teaspoon salt
gel food dye if using juice or puree
potato or corn starch
powdered sugar
  • Line an 8 x 8-inch square pan with parchment paper. Brush with a very thin layer of vegetable oil and sprinkle generously with powdered sugar.
  • In the mixing bowl of a stand mixer with the whisk attachment, combine water and vanilla extract. Sprinkle the gelatin and leave to soften.
  • In a heavy saucepan, combine sugar, salt, corn syrup and water. Heat to boiling while stirring until sugar has dissolved. Clip a candy thermometer and continue to cook on medium heat without stirring until it reaches 240° F.
  • With the mixer at low speed, carefully pour the hot syrup slowly down the side of the bowl into the gelatin mixture. When the mixture has slightly thickened, increase the speed to high and whip until mixture is fluffy and stiff, about 10 minutes, adding food dye if using.
  • Pour marshmallow into the parchment lined pan and smooth with a lightly oiled rubber scraper if necessary. Leave uncovered at room temperature for 10-12 hours or in the refrigerator for 3 hours until set.
  • Mix equal parts cornstarch and powdered sugar and sprinkle over the marshmallows. Turn the marshmallow onto a cutting board generously sprinkled with powdered sugar and starch mixture, peel off paper and dust with more of the powder mixture. Cut into desired size and dredge all sides again in the powder mixture. Shake off excess powder.

This is a very messy project. Strings of marshmallows got stuck everywhere including my hair. And I went outside to blow off some of the excess powder on the plate of marshmallows and the powder went all over my red shirt, shoes, hair.... but it's worth all the mess in the kitchen and myself. I'll make them again when I feel like fruity marshmallows; hmm, blueberries sound good. I'll wear a light colored shirt next time I make them.:p

Messy Shirt
messy

September 12, 2010

Parmesan Biscuits

Labels: , , ,

Parmesan Biscuits

These Parmesan biscuits are the easiest I have ever baked. It took me just a little over 30 minutes from start to finish including preheating the oven. The recipe is from the cookbook Biscuit Bliss by James Villas. The book is thin and small but has loads, 101 in all, of delicious sweet and savory biscuits and some scones to choose from and delivers on its promise of having fresh fluffy biscuits in just minutes.

This recipe doesn't have butter but has lots of heavy whipping cream. The round [and some rectangular] biscuits came out light, airy, flaky, and cheesy. Soooo good.

Parmesan Biscuits
Parmesan Biscuits
light airy flaky cheesy biscuits

Parmesan Biscuits

adapted from Biscuit Bliss by James Villas

2 cups all purpose flour
1 tablespoon baking powder
½ teaspoon salt
1½ cups freshly grated Parmesan cheese
1¼ cups heavy whipping cream
  • Preheat oven to 425°F.
  • In a large mixing bowl, whisk together the flour, baking powder, and salt. Add the cheese and stir till well blended. Add the cream and stir until the mixture becomes a loose dough.
  • Transfer dough to a lightly floured surface and knead 8 times. Pat out the dough ½ inch thick and cut out rounds with a 2½-inch biscuit cutter or into 2 x 1 inch rectangles. Pat the scraps together and cut out more rounds. Arrange the biscuits on a baking sheet ½ inch apart and bake in the upper third rack for 13 to 15 minutes or until golden.

Next on my biscuit baking list from the book is Thomas Jefferson's Sweet Potato Biscuits that has lard, heavy cream, ginger, cinnamon, allspice, and pecans. Doesn't it sound yummy? I can't wait to make them.

 
Design by New WP Themes | Bloggerized by Lasantha - Premiumbloggertemplates.com