Showing posts with label homemade. Show all posts

July 25, 2021

Cheese Ice Cream

Labels: , ,

homemade cheese ice cream

Kraft has recently introduced for a limited time Macaroni & Cheese Ice Cream flavor. Here are the ingredients from the ice cream maker VanLeeuen which they label GOOD INGREDIENTS 😏😏😏
cream, milk, cane sugar, egg yolks, Kraft cheese sauce mix (whey, milkfat, salt, milk protein concentrate, sodium triphosphate, contains less than 2% of tapioca flour, citric acid, lactic acid, sodium phosphate, calcium phosphate, with paprika, turmeric, and annatto added for color, enzymes, cheese culture)Contains: milk, eggs
I have no intention of buying it just to have a taste because all the ice cream in the US are overly sweet. Cheese ice cream has been a favorite flavor of mine and many people in the Philippines. Ice cream in carts, usually parked outside schools, sell this flavor along with perennial favorites mango, ube, and jackfruit. The cheese flavor became very popular in the country that the big dairy companies started making and selling the flavor at grocery stores for many years now. The ice cream is labeled either Keso, the Tagalog spelling of Spanish Queso (cheese) or Queso Ice Cream.

I loved the ice cream sandwiched between soft buns called monay. I have made cheese ice cream  several times with just whole milk, cream, sugar, and shredded cheddar cheese. I don't like it with egg yolk or any flavorings like vanilla extract. The flavor of just salty cheddar cheese and sweet cream is the best IMHO. I don't use thickeners and colorants in my homemade ice cream either, although the cheese I use has annatto coloring. If you have cheese powder in your pantry, you can use that instead of shredded cheese. I prefer the salty little bits of cheese on my tongue when I eat this ice cream.

December 7, 2020

Homemade Ube Butter

Labels: , , ,


I bought from an online Filipino store a few items and they gave me a small jar of Ube Butter for free. The ube butter is similar to Biscoff spread because it is also made with cookies and butter. The cookies have ube flavoring, most likely unnatural and not real ube (purple yam from the Philippines). I didn't like it because it is too sweet for my taste and I was put off by the violent color. Yes, violent is not a typo. 

Ube is not supposed to be this dark violet. Real ube yam is a lighter shade of purple and when cooked in milk and sugar should be light purple or very dark lilac. I also didn't like the artificial flavor of the store-bought ube butter so I made my own with homemade Ube Jam and butter plus a little powdered xylitol. Needless to say I prefer homemade Ube Butter because it is made with just Ube Jam and salted butter and the color is very very light lilac. I prefer salted butter because IMHO, salt enhances the flavor of sweets. 


If you are using store-bought ube jam, make sure the color is not very dark purple because it will taste of fake ube flavoring that comes in a small bottle. If you don't mind the artificial flavor, then go ahead and use it.

The recipe for homemade Ube Jam is here.

August 28, 2018

Homemade Coconut Jam

Labels: , , , ,


Several months ago, I bought from a Filipino grocery store a jar of the best [IMHO] coconut jam. The label says it's from Quezon province. The jam is very dark and thick but surprisingly not very sweet. It's too far to drive to the store and the Filipino online store has sold out.


July 5, 2017

Baumkuchen (Tree Cake)

Labels: , , , ,


I've seen homemade Baumkuchen (tree cake) on several Asian blogs many years ago but never had the energy to make although I have a rectangular tamagoyaki pan.

January 24, 2017

Homemade Chili Powder

Labels: , , ,


Lately, I have been making my own powdered spices. It started with cumin. I can't eat any store-bought cumin powder in jars because it tastes raw as if I'm eating dirt or something. Cumin seeds IMHO should be toasted first before grinding to release their aroma and flavor. The store-bought spices, including the expensive ones, are also almost always stale and lacks flavor.

July 12, 2016

Homemade Maple Sugar Granules

Labels: ,


Every day I have steamed white rice and breads but I eat high carb food in moderation and haven't had bottled sodas for many many years now. Recently, I started incorporating stevia and xylitol together with regular white or raw sugar into desserts and baked goods. The xylitol I use is made from birch bark and manufactured here in the USA. Most xylitol brands in the USA are made with corn and they are imported from China which is a no no for me. I found out recently that ALL stevia products in the USA come from semi-processed and already whitened material from CHINA! That's absolutely unacceptable and they are most likely more harmful than white cane sugar to every person who tries to avoid processed sugar cane. Any food item made in China will always be suspect regardless of the manufacturers' assurances that their processing are the best. Are they kidding me? The words best and China shouldn't be in the same sentence...EVER!! Remember the tainted toothpaste, dog food, and powdered milk that killed people and dogs around the world, and their own babies, for crying out loud!

January 13, 2016

Homemade Raw Apple Cider Vinegar

Labels: ,


If health websites are to be believed, raw apple cider vinegar could remedy a lot of common ailments from asthma to colds and coughs and may help in losing weight. ACV is natural and cheap and there's really no harm in having it every day, I guess.

March 9, 2015

Flour Tortillas

Labels: ,


I cookedPuerco Pibil for the umpteenth time which I always have with white rice. I suddenly wanted the pork dish wrapped in flour tortillas. I made a small batch of tortillas using a recipe that doesn't have baking powder (not recommended). Rolling the dough into thin rounds was time consuming and the dough tends to shrink when transferring to the skillet. Then I remembered I have an electric tortilla maker I bought from eBay many years ago. It was for baking something else, not for making tortillas, but I have forgotten about it after storing it. Story of my life: Buy it, store it, and forget it!

February 16, 2015

Homemade Powdered Ginger

Labels: ,

>

I use fresh ginger regularly but not a lot of the commercial ginger powder. A small container becomes stale, bland, and not as aromatic before I'm able to use it all up. I can't remember the last time I bought and I was shocked that it costs so much. The smallest container of McCormick® is $7.00 and some fancy bottled "gourmet" brand is $15.00. Really?

September 15, 2010

Marshmallows

Labels: , , ,

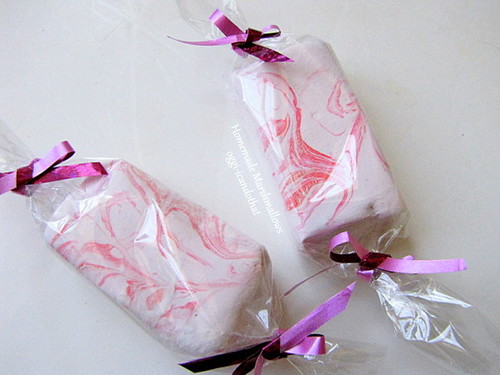
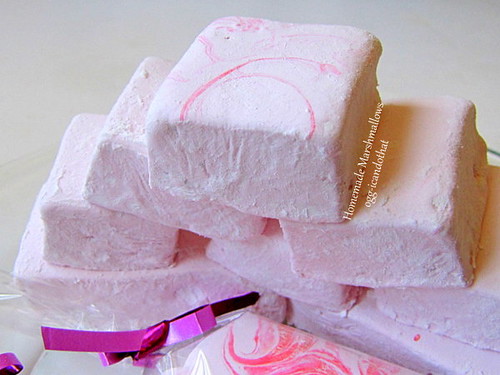
Raspberry Marshmallows
homemade marshmallows with raspberry puree

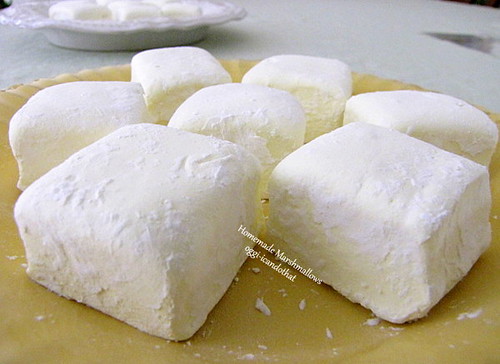
Lemon Marshmallows
sour and sweet lemon marshmallows

I made marshmallows yesterday and today using a recipe that doesn't have egg whites. I have a carton of raspberries, pureed them and used it instead of water to soften the gelatin powder. The fruit is naturally tart and cuts the sweetness of these melt-in-your-mouth marshmallows. These homemade candies are superior to the one from the stores. They're so light and fluffy and I was so pleased with the result I made a second batch using fresh lemon juice because I love Super Lemon, the pucker-inducing deliciously sour and sweet hard candies from Japan. The marshmallows are sour enough but I'd like to coat it with the super sour powder similar to the hard candy's if I can figure out where to buy it.

Marshmallows
2 envelopes unflavored gelatin
3 ounces water, fruit juice, or fruit puree
1 tablespoon vanilla extract
1 ½ cups sugar
3 ounces water
5 ounces light corn syrup
¼ teaspoon salt
gel food dye if using juice or puree
potato or corn starch
powdered sugar
  • Line an 8 x 8-inch square pan with parchment paper. Brush with a very thin layer of vegetable oil and sprinkle generously with powdered sugar.
  • In the mixing bowl of a stand mixer with the whisk attachment, combine water and vanilla extract. Sprinkle the gelatin and leave to soften.
  • In a heavy saucepan, combine sugar, salt, corn syrup and water. Heat to boiling while stirring until sugar has dissolved. Clip a candy thermometer and continue to cook on medium heat without stirring until it reaches 240° F.
  • With the mixer at low speed, carefully pour the hot syrup slowly down the side of the bowl into the gelatin mixture. When the mixture has slightly thickened, increase the speed to high and whip until mixture is fluffy and stiff, about 10 minutes, adding food dye if using.
  • Pour marshmallow into the parchment lined pan and smooth with a lightly oiled rubber scraper if necessary. Leave uncovered at room temperature for 10-12 hours or in the refrigerator for 3 hours until set.
  • Mix equal parts cornstarch and powdered sugar and sprinkle over the marshmallows. Turn the marshmallow onto a cutting board generously sprinkled with powdered sugar and starch mixture, peel off paper and dust with more of the powder mixture. Cut into desired size and dredge all sides again in the powder mixture. Shake off excess powder.

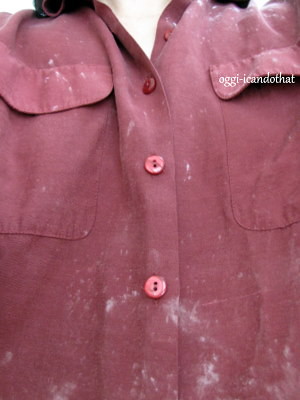
This is a very messy project. Strings of marshmallows got stuck everywhere including my hair. And I went outside to blow off some of the excess powder on the plate of marshmallows and the powder went all over my red shirt, shoes, hair.... but it's worth all the mess in the kitchen and myself. I'll make them again when I feel like fruity marshmallows; hmm, blueberries sound good. I'll wear a light colored shirt next time I make them.:p

Messy Shirt
messy

March 15, 2009

Soymilk

Labels: , , ,


warm freshly made soymilk: so good

We have been buying soymilk since forever and only recently noticed that most brands have additives such as sugar to mask the "beany" flavor and xanthan gum or carageenan for a creamier texture. Making soymilk was never in my must-make list until I saw and clicked on an ad for soymilk maker. I didn't know these makers are available for soymilk enthusiasts. Searching online for making soy milk without a machine, I found a lot of websites including Martha Stewart teaching how to make soymilk at home.

I happen to have a 32-ounce bag of soy beans sitting in the pantry, I can't remember why I bought it. Maybe it was waiting to be made into milk. After one sip of the still warm delicious plain no-sugar milk, I am convinced homemade soymilk tastes superior to the ones in cartons. The milk has the slight beany taste of silken tofu which is why I love it. I noticed that unlike the store-bought there are no grits at the bottom of my cup and in the jar. The thickness can also be adjusted to individual preference.

Here's a a how-to video


For a little more than a liter of soymilk you will need:
1 cup dried soy beans
water
blender
a large piece of washed and dried muslin or fine cheesecloth
tall stock pot
sieve
2 large bowls
heat-proof spatula
pinch of salt and 1 tablespoon raw sugar, if desired
  • Rinse soybeans, drain, and add water to cover 2 inches over the beans. Soak beans overnight at room temperature. The next day, drain the water, rinse twice, and drain very well. Hull the beans, if preferred. Place half of the beans with double the amount of water in the blender and blend on high for 2 minutes. Transfer into a large bowl. Remove all the foam on top with a small sieve. Repeat with the rest of the beans.
  • Place a sieve on top of another bowl, line with the muslin. Pour the liquid through the muslin and let drip into the bowl. Gather the corners of the muslin and twist the top. Press to extract as much liquid as possible.
  • Boil 1 cup of water in the stockpot, add the extracted liquid, add salt and sugar if using, and over high heat let the mixture come to a boil, constantly stirring and scraping the bottom. Turn down the heat to medium and simmer the milk for 25 minutes. Stir down the foam as it rises until it dies down. Transfer into a clean jar, cover, and refrigerate.

dry soy beans, soaked and hulled beans, simmering soymilk, okara, toasted okara

In making soymilk at home I also learned about okara, the pulp left in the cheesecloth after straining the liquid, which I will use for baking breads; and accidentally soybean skin (yuba). I removed the skin that formed on top of the cooking milk, ate it when it had dried a little, and it tasted exactly like the vegetarian dish we always have at our favorite Chinese restaurant. By boiling the milk and collecting the skin until all the milk is used up, I might be able to recreate my favorite Chinese dish at home. That will be my next project.:-)

August 27, 2008

Homemade Greek-style Yogurt

Labels: , ,

homemade Greek-style yogurt is a s good as store-bought

yogurt cheese balls in olive oil

I'm a late bloomer in appreciating yogurt. Just a little over a year ago I wrote about my aversion to frozen yogurt although I have always loved tzatziki. I can't remember what brought it on but early this year I started liking yogurt including drinks, smoothies, kefir, and lately cheese which is so much yummier than cream cheese. I can't seem to get enough of it, I always keep a tub or two in the refrigerator. The cookbook FROM THE LANDS OF FIGS AND OLIVES has several recipes for making yogurt (laban) and yogurt cheese. I got curious if it is really that easy to make yogurt at home and yes I can say after making several batches it's a piece of cake but the process takes at least 2 days which is not so bad if I want an endless supply of yogurt. To make a flavorful yogurt at home I only need milk and 2 T of Greek-style yogurt available from the grocery, I make sure they have no additives like xanthan gum, rennet, or gelatin. I use a flat-bottomed super-fine plastic strainer set on a bowl instead of the usual cheesecloth hanging on something to let the whey drip into a container underneath. That method takes lots of space in the refrigerator and I don't know where to hang the cheesecloth bag from. The end result is the same anyway. I also make cheese balls by adding salt to the yogurt and letting them drain some more on several changes of round coffee filters until they are drier and firmer.

Homemade Greek-style Yogurt
2 quarts milk
2 T Greek-style yogurt, at room temperature
  • Place yogurt in a well-cleaned 2-quart jar with wide mouth (you may use a glass bowl). Stir several times with a rubber whisk until smooth. Set aside. 
  • Clip a thermometer on the side of a medium saucepan, add the milk and heat over medium heat to 180°F, stirring occasionally to ensure correct reading. Turn the heat off and let the milk cool to 115°F.
  • Pour about ¼ cup of the warm milk into the jar, whisk gently until smooth. 
  • Add the rest of the milk ¼ cup at a time, whisking after each addition to make sure the yogurt is mixed in thoroughly.
  • Cover top of jar with a coffee filter and secure with an elastic band. 
  • Place in an oven with light on and leave for 6 hours or overnight.
  • The yogurt should have set after 6 hours.
  • Pour into a fine plastic strainer set over a bowl. Leave in the refrigerator overnight to drain.
  • The yogurt is now ready to eat or make into cheese. Transfer into a suitable container with a tight lid. This will keep for 2 weeks in the refrigerator. Yield: 1¾ C
I'm sending this to Joelen's Culinary Adventures: Tasty Tools (Whisk).

 
Design by New WP Themes | Bloggerized by Lasantha - Premiumbloggertemplates.com