June 12, 2011

Zucchini Blossoms Crêpes

Labels: , , ,

Zucchini Blossom Crepes
savory crêpes filled with zucchini blossoms, baby vegetables, and cheese

Zucchini Blossoms
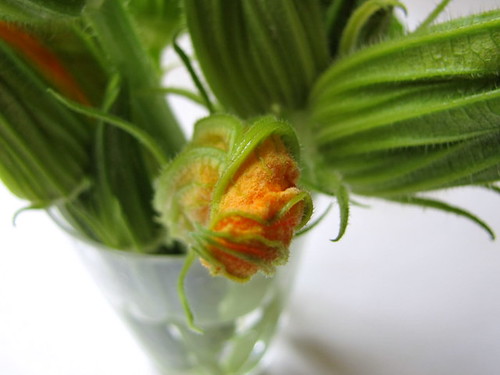
fiori di zucca (zucchini blossoms)

I grew up eating plenty of vegetables and one of my favorites was steamed squash blossoms. We never had them stuffed nor deep-fried; we cooked them by putting on top of freshly cooked rice and left to wilt and soften for a few minutes. They were simply served with sea salt and lemon juice (calamansi).

I planted a few seeds of fiori di zucca bought from an online seed company, the catalog promises the plants will yield mostly flowers and few tiny/baby fruits. Indeed the plants have lots and lots of bright orange blossoms and one or two tender tasty sweet fruits. I chopped the fruits and sauteed them with the blossoms, shallots, and baby Swiss chards and used it to fill savory crêpes for a light but delicious and satisfying summer lunch dish. I love the Parmesan cheese crust and the crispy edges but tender on the inside pancakes. The mild flavors of the vegetables and Provolone go perfectly well with the small amount of Parmesan cheese.

Zucchini Blossom Crepes

Fiori di Zucca Crêpes
crêpes
1 cup all-purpose flour
1 egg
½ teaspoon sea or kosher salt
1¼ cups water
¼ cup light olive oil
  • Blend ingredients in a blender and let rest on the kitchen counter or refrigerator for 1 hour.
  • Heat a nonstick skillet over medium-low heat; brush lightly with light olive oil. Stir batter and pour about 2½ tablespoons, swirling to coat the skillet evenly. Cook until edges come off the skillet, then flip and cook for another 30 seconds. Remove to a plate and continue with the rest of the batter.
filling for 8 crêpes
20 pieces zucchini blossoms
1 tablespoon butter
2 tablespoons finely minced shallots
1 cup coarsely chopped baby zucchini
1 cup chopped baby Swiss chard, optional
½ teaspoon sea salt or to taste
½ cup grated Parmesan cheese, divided
½ cup grated Provolone cheese
  • Reserve 4 blossoms cut in half lengthwise for garnish; cut remaining blossoms into 4 pieces; set aside. Heat butter in a skillet and saute shallots until soft, about 2 minutes. Add baby zucchini and saute for 2 minutes; add blossoms and Swiss chard, if using, and saute for 2 minutes. Turn heat off and mix in ¼ cup Parmesan cheese.
  • Fill crêpes: Place 2 tablespoons of grated Provolone on one half of each crepe, top with 2 tablespoons of sauteed vegetables, fold over in half and fold one more time. Repeat with the rest of ingredients. Place filled crêpes on an oven-proof dish, slightly overlapping. Sprinkle top of each with half a tablespoon of Parmesan cheese and press one blossom half on top. Place under the broiler until Parmesan is golden brown and edges of crêpes are crispy.

June 9, 2011

Ensaimada Loaf

Labels: , , ,


Food Friday


After shaping 2 large ensaimadas filled with ube jam, I realized I had to attend to a lot of stuff around the house, make tons of phone calls, and do errands. To save time I formed the rest of the dough into eight 2½-ounce rounds and placed them in a 9 x 4 x 4-inch loaf pan a la Brioche Nanterre. The baked ensaimada loaf is just as pillowy soft as regular ensaimada. I made the slices extra thick; so good with lots of butter, sugar, and grated cheese, and of course ube jam.

The recipe for ensaimada is here.

*It's nice to be back cooking, baking, and blogging after a brief break*;-)

May 22, 2011

Steamed Flower Rolls for Kulinarya Cooking Club

Labels: , , , , , , , , , ,

Steamed Flower Pao
steamed flower rolls (pao)

Sefie and Connie chose Flores de Mayo (May Flowers) for this month's Kulinarya theme. Flores de Mayo is a colorful month-long festival held all over the Philippines honoring the Blessed Virgin Mary, with small girls all dressed in white offering flowers. The highlight at the end of the month is a combination religious and beauty pageant procession [held after attending a novena in church] called Santacruzan (from the words Holy Cross) featuring pretty young ladies dressed in beautiful elaborate gowns, each portraying biblical and historical women such as Veronica, Queen of Sheba, the 3 saints/virtues as queens of Faith, Hope, and Charity, and the last spot in the order of the procession is the queen of all the queens, Reina Elena (Empress Helena of Constantinople who is traditionally credited with finding the one true cross), escorted by a boy portraying her son Constantine. This spectacular religious flower festival is a must-see for anyone visiting the Philippines during the month of May.

Now on to the challenge. I was initially stumped and couldn't think of any Filipino dish to make that has flowers or at least flower design on it. I made a paella-like dish with whole banana blossoms, clams, prawns, and pork. The dish was delicious but not photogenic and was eaten right away before I was able to take photos. I didn't want to make a cake or another sweet stuff so I braised pork belly with soy sauce, sugar, fermented black beans, and dried banana blossoms and lily flowers. But heeding Sefie's suggestion to think outside the "flower box" I ended up making steamed buns (pao) but followed the shaping method for making Chinese flower rolls. *I need a little more practice to have perfectly looking flower pao.* These are so good with the braised pork and great for soaking up the greasy sauce.(^-^)

Steamed Flower Pao

Dried Blossoms for Cooking
Braised Pork Belly with Dried Banana and Lily Flowers
pork belly braised in soy sauce, fermented black beans,
brown sugar, dried banana blossoms, and dried lily flowers

And because I'm an ube (purple yam) fiend, I couldn't resist adding ube jam to a small portion of the dough, layered it on top of another small portion of the dough for a sweet ube pao. They don't look like a flower at all but they are delicious.

Steamed Ube Pao

Steamed Flower Rolls (Pao)
1 recipe siopao dough
light olive oil
sea salt
chopped scallions
  • Prepare the dough. After the first rising, divide into 3 portions. Flatten each portion into a rectangle, about 1/8 inch thick or thinner. Brush all over with oil, sprinkle salt and scallions. Roll from the short end jelly roll style and cut into 1½ inch slices. Press a plastic chopstick in the middle of the sliced dough all the way to the bottom being careful not to sever it; place on a piece of parchment paper. Repeat with the rest of the dough. Cover with plastic wrap and let rise for 45 minutes. Steam over rapidly boiling water for 10 minutes.
See more flowery dishes from KCC members here.

Psst, check out my "flower" desserts, Apple Carpaccio and Cherry Blossom Friendship Cake, and drink Almond Milk with Rose Essence.

***********************************************************

KCC


Kulinarya was started by a group of Filipino foodies living in Sydney (Kath, Trisha, and Trissa), who are passionate about the Filipino culture and its colorful cuisine.

Each month we will showcase a new dish along with their family recipes. By sharing these recipes, we hope you find the same passion and love for Filipino Food as we do.

***********************************************************


A photo courtesy of EricRP of a moderately attired reina, the Queen of Justice. The list of procession participants is here.


Santacruzan, originally uploaded by EricRP.

May 19, 2011

Dayap Daiquiri Slushy

Labels: , , , ,

Key Lime Daiquiri Slushy


Food Friday

I was watching the 1959 black and white movie Our Man In Havana from the director/writer team of Carol Reed and Graham Greene (THE THIRD MAN and FALLEN IDOL) and "the man in Havana", played by Alec Guinness always has a Daiquiri, the popular drink made with lime juice, a little sugar, and rum.

I made mine with dayap (Key limes) and more sugar into a Daiquiri slushy using a blender. It's watered down because of the ice but that's how I like it, sweet and tart with a little bit of alcohol. BTW, the proper pronunciation is "die-kee-ree," not "dack-uh-ree".

Dayap Daiquiri Slushy
serves 1

juice of 3 Key limes
1 tablespoon rum
1½ tablespoons sugar
1 cup ice
water, if needed
  • Blend on high until slushy. Pour into a glass and enjoy.

May 16, 2011

Goose Egg

Labels: ,

Goose Egg

I'm happy I got a goose egg, not a zero but a real goose egg. I bought a few pieces along with duck eggs directly from the farm where the birds are being raised. I would have bought a turkey egg but they ran out. Maybe next time when I go back there which is not too far from my house, about 20 miles, but driving there was a bit dizzying. From the main highway I had to drive on a narrow 2-lane loooong and winding road which I thought at first is endless. There are a lot of farms in the area with livestock, fruits, and vegetables. Some of them sell in the farmer's market near my house but the family who sells duck and goose eggs doesn't want to pay the annual fee for a space in the farmer's market. So if I want more duck/goose eggs I will have to drive there again.

Goose eggs are huge. One egg is equivalent to 4 large chicken eggs. The white is translucent and much thicker too. I cooked one with half a tablespoon of butter very slowly on low heat while stirring constantly. The result is a creamy and moist omelet with almost like yema (egg yolk) candy consistency. The flavor is rich and not as eggy. I also made a fluffy omelet with one each of duck, goose, and chicken; that's equivalent to a 7-egg omelet.

Incredible Edible Eggs
their free-range chicken eggs are also huge, almost as large as a duck egg

Goose Egg
goose eggs have very thick shells; artists blow out the
contents, paint something on the shells, and they sell them

Incredible Edible Eggs
Duck, Goose, and Chicken Omelet
duck, goose, and chicken omelet

I don't have the patience to poke one small hole and a pin-size hole on two ends of the goose egg shell and also I can't draw or paint that well so I put one of my photos on an Easter egg design on the Dumpr website where you do all sorts of things to your photos, like distorting your face or make them look like old photos. Try it, it's fun.


May 10, 2011

Queijadas

Labels: , ,

Queijada

A reader asked if I will soon be baking a Filipino cheese bread that doesn't have any cheese in it and I said I've never heard of this bread. But I have come across the phrase "no cheese in the dough" and mistakenly looked for it in one of my Spanish cookbooks, but later found it in FLAVORS OF PORTUGAL by Tania Gomes. The custard tartlets are called queijadas (cheese tarts) but they don't contain any cheese. The recipe is short and simple with very few ingredients. The tarts have a creamy consistency and very satisfying as a dessert or snack.

Queijadas
adapted from FLAVORS OF PORTUGAL by Tania Gomes

3 whole eggs
1 cup sugar
¾ cup all-purpose flour, sifted
1 teaspoon baking powder
¼ teaspoon pure vanilla extract
2¼ cups milk
soft butter to grease muffin pans
  • Preheat oven to 400°F.
  • Generously grease shallow non-stick muffin cups with butter. (Do not line muffin cups with paper)
  • In a large bowl, beat eggs and sugar together until very light and lemon colored. Whisk together flour and baking powder and blend into the egg mixture. Stir in vanilla extract and milk. Fill muffin cups 2/3 full. Bake for 20 minutes or until golden brown.
  • Remove from pan and let cool on a wire rack. Store/serve on paper muffin liners.
Queijada

May 5, 2011

Peanut Sans Rival

Labels: , , , ,

Peanut Sans Rival
peanut sans rival

Food Friday


This semi-frozen sans rival has tons of peanuts and a little chocolate, peanut lovers will surely love it. I made the peanut meringue layers thicker than the regular sans rival but crunchy, the filling/frosting has peanut butter buttercream then sprinkled with a little chopped semi-sweet chocolate, and the top is garnished with chopped Choc*Nut. Sooo delicious and peanut-y.

Sans Rival recipe is here.

Peanut Sans Rival
Peanut Sans Rival
the ultimate peanut sans rival for peanut lovers

May 4, 2011

Sweet Red Bean Paste

Labels: , , , , ,

Red Beans

I love the smoky flavor of sweet red bean paste and regularly buy the canned Japanese ones but lately I find them overly sweet. I decided to make the paste from scratch mainly to reduce the sugar content. It's not a very difficult process and 2 cups of dried beans make a large batch of sweet paste, about 5 cups, that can fill a lot of pao (steamed buns), baked buns, and hopiang hapon (Japanese-style Filipino-Chinese cakes). I've made the super flaky Filipino Chinese hopia which is a tad complicated and thought making hopiang hapon would be easier because the dough I remember was not as flaky and greasy as the regular hopia, probably closer to moon cake dough.

There aren't many recipes for Filipino hopiang hapon and I adapted the dough from the only one I could find. I underbaked the hopia and they came out pale; and although they don't look like the ones from the Philippines, they taste almost identical. The dough is soft and not sweet at all and I can't stop eating them, they're that good. I'll use a moon cake dough recipe next time I make these.

Sweet Azuki Bean Mini Pao
mini sweet red bean pao

Buns Filled with Sweet Azuki Paste
baked sweet buns

Hopiang Hapon
hopiang hapon


Sweet Red Bean Paste
2 cups small red beans (azuki)
4 cups water + more to cover
1 cup sugar
2 tablespoons light olive oil
  • Clean, rinse, and soak beans overnight in 4 cups water. The next day, drain beans and place in a large non-stick sauce pan; add fresh water to cover and cook over medium heat until tender. Drain, add sugar and oil, and cook over medium-low heat, stirring often until soft and mixture appears dry. For coarse consistency, mash with a potato masher or blend in a blender if fine consistency is preferred. The paste should hold its shape but still moist. Let cool to room temperature, transfer into a container, wrap tightly with plastic wrap and refrigerate until needed.
The recipe for steamed pao dough is here.

Hopiang Hapon

Hopiang Hapon

dough

1½ cups all-purpose flour
2 tablespoons sugar
pinch of salt
¼ cup cubed cold butter
¼ cup light olive oil
¼ cup water
1 whole egg

filling
1½ x ½-inch sweet red bean paste disks

egg wash
1 egg yolk
1 teaspoon water
  • Whisk together flour, sugar, and salt. Cut in cold butter with fingertips. Stir in the rest of the ingredients until combined. Knead lightly just until a smooth dough is formed. Divide into 2 equal pieces and form into logs. Refrigerate for 1 hour. Slice each log into 8 pieces. Flatten each piece into 1/8 inch thick circles. Place a disk on the center and gather the edges. Pinch together and place on a sheet pan, seam side down. Brush with egg wash and bake in a preheated 375°F oven until golden.

Bonus info: The Japanese use ground azuki beans as a facial exfoliating agent. A fellow shopper, a Japanese woman, told me while we were at The Body Shop that her secret to a smooth unblemished facial skin is ground azuki which the store was selling at the time. The grounds came in a tiny box with holes at the top. You wet a small amount on your palm and massage the paste in a circular motion all over your cheeks, forehead, and chin. I used the ground beans on my face for many years but the store discontinued the product. It really works great in removing dead skin making my face smooth as a baby's. I should probably grind some.;-)

April 29, 2011

Food Friday: Cookies and Candies

Labels: , , , , , ,

Paciencia Cookies
paciencia (patience), very crunchy 1-inch macaron-like cookies but without nuts


Filipino Candies
Filipino candies


Food Friday


Paciencia cookies, which are of Spanish origin, look like the French macarons complete with tiny feet but they are made with just flour, egg whites, sugar, and vanilla extract. The ones from La Pacita bakery have egg yolks, though, but I like that they are very very crunchy and addicting...you can't stop eating once you start popping one in your mouth. And I just had to grab a packet of Mangorind, combination mango and tamarind, when I saw it at the store. They are sweet and tart and I love its chewy texture similar to fruit leather or pate de fruits. The packet of hard mints with soft chocolate centers was a gift from an online Filipino grocery store. The candies taste a lot better than the ubiquitous Halls mentholyptus (menthol + eucalyptus) candies and perfect as after-dinner mints. I keep several pieces in my handbag so I have something to "eat" when I get hungry while shopping.

April 28, 2011

Crispy Flaked Chicken and Pork Adobo

Labels: ,

Crispy Chicken Pork Adobo Flakes


I first read about crispy adobo flakes from the Filipino cookbook MEMORIES OF PHILIPPINE KITCHENS by Amy Besa and Romy Dorotan. As much as I wanted to try it at the time I was deterred by deep frying. That was 4½ years ago. Last week, I discovered the flaked adobo doesn't have to be deep fried. A tablespoon or two of olive oil and a cast iron pan do the job well. I was reheating some left over pork and adobo in a cast iron pot and left it for a few minutes on medium heat. The meat on the bottom of the pot became crunchy. I turned off the heat, let the meat cool down a bit, then I flaked them, returned some to the pot with a tablespoon of olive oil and pan fried, while stirring every 2 minutes until dark brown and crispy. There, crunchy flavorful adobo flakes without the inconvenience of deep frying.

Crispy Flaked Adobo


Crispy Flaked Pork and Chicken Adobo
1 pound boneless chicken pieces
1 pound skinless pork belly, cut into 2-inch pieces
1 cup coconut or apple cider vinegar
1 tablespoon sea salt
1 tablespoon soy sauce
1 whole garlic bulb, skinned and smashed
¼ teaspoon freshly ground black peppercorns
1 bay leaf
1 tablespoons extra virgin olive oil
extra virgin olive oil for frying
  • Place all ingredients, except olive oil for frying, in a medium nonstick pan and cook until dry, stirring once or twice. [Do not add water.] Remove bay leaf and discard. Let cool and flake meat. Fry small batches in a cast iron skillet on medium heat until golden to dark brown and crunchy. Serve as appetizer, on pandesal, or with rice.

April 27, 2011

Daring Bakers: Maple Mousse In An Edible Container

Labels: , , , ,

Maple Mousse in Candied Bacon
maple mousse in candied bacon topped with chocolate meringue


Maple Mousse in Lemon Rind Confit
maple mousse in lemon rind confit topped with ginger-flavored meringue


Maple Mousse in Chocolate Boat
chocolate boat, split tiny banana, semi-frozen maple mousse,
sweet cream, cherry

The April 2011 Daring Bakers’ challenge was hosted by Evelyne of the blog Cheap Ethnic Eatz. Evelyne chose to challenge everyone to make a maple mousse in an edible container. Prizes are being awarded to the most creative edible container and filling, so vote on your favorite from April 27th to May 27th at http://thedaringkitchen.com!


The edible containers theme continues with this month's Daring Bakers. Thanks Evelyne for allowing us to choose our containers for the light, airy, and delicious maple mousse.

Maple Syrup Mousse
1 cup pure maple syrup
4 large egg yolks
1 tablespoon unflavored gelatin
1 ½ cups whipping cream (35% fat content)
  • Bring maple syrup to a boil then remove from heat. In a large bowl, whisk egg yolks and pour a little bit of the maple syrup while whisking to temper the yolks. Add warmed egg yolks to hot maple syrup until well mixed. Measure ¼ cup of whipping cream in a bowl and sprinkle the gelatin. Let it rest for 5 minutes. Place the bowl on top of a pan of barely simmering water, stir to ensure the gelatin has completely dissolved. Whisk the gelatin mixture into the maple syrup mixture and set aside. Whisk occasionally for approximately an hour or until the mixture has the consistency of an unbeaten raw egg white. Whip the remaining cream. Stir ¼ of the whipped cream into the maple syrup mixture. Fold in the remaining cream and refrigerate for at least an hour. Remove from the fridge and divide equally among your edible containers.
One of Evelyne's suggestions for containers is crispy bacon cups. I made them sweet and extra crunchy by dipping them in raw sugar before baking. I have candied bacon before and loved them as a snack but never tried it with ice cream or mousse. The crunchy bacon combined with maple mousse and chocolate meringue is heavenly.

Candied Bacon Cups
strips of bacon
golden raw or light brown sugar
  • Snip bacon strips on both sides and dip in sugar. Form into coils and place in muffin cups. Bake in a 400°F oven until edges and bottom are dark brown. Leave for a minute in cups to cool and set slightly. Transfer on a plate with paper towel to remove excess grease. Let cool completely on a wire rack before filling with mousse.

I had a few lemon rind confit in the refrigerator and thought the tangy, slightly bitter, and sweet rinds would be perfect containers for the mousse. I added a pinch of ground ginger to half of the meringue recipe and the ginger flavor is just about right, not too weak nor strong. I love this combination too.

Lemon Rind Confit
14 ounces sugar
6 ounces glucose
12 ounces water
4 lemons, cut in half crosswise
water
  • Heat sugar, glucose, and water until sugar dissolves. Let cool.
  • Juice lemons, keep juice for another use. Scrape and clean the insides of the lemon rinds leaving the white pith on. Boil water and add rinds; boil for half a minute then drain. Boil and drain 4 more times with fresh water each time.
  • Bring the syrup to a boil in a pot. Add the blanched rinds and let simmer for 1 hour, making sure the syrup does not boil and completely covers the rinds. Turn heat off and let rinds cool in the syrup. Transfer to a container, cover tightly and refrigerate until needed.
  • Trim the bottom if using as a container for mousse or ice cream.

April 17, 2011

Cebu Torta

Labels: , , , ,

Cebu Torta
Cebu Torta


I'm so glad Kat and Lala, our Kulinarya Cooking Club hosts chose Decadence for April 2011 because I've been itching to make Cebu Torta for a few years now but never had the courage to make them...they're too darn rich for my own good. Reading the amount of egg yolks alone is enough to give me heart palpitations. Cebu torta as described on many websites sounds like the love child of this extra-rich Filipino ensaimada and leche flan...let's see...

large number of egg yolks ✓
loads of lard or butter ✓
tons of sugar ✓
sweetened condensed milk ✓

I made a very small batch following the traditional recipe, replacing tuba (coconut toddy) with sweet wine and a pinch of yeast; the torta was a bit acidic and not very good but still edible. It's probably my fault for adding yeast and letting it ferment longer than necessary. I baked a second torta adapting Market Manila's recipe which uses baking powder as leavening. I used buco juice in place of water and baked one half of the dough in large muffin pans at 350°F which produced dense cakes with a slight bump at the center. The other half of the dough was baked in small shallow tartlet molds in a hotter oven. They came out less dense, not fluffy, just a tad airier than the large ones. I love them both. These cakes are super rich, sweet, moist, and may be addicting (not good). Torta spells D-E-C-A-D-E-N-T and should be consumed only once a year, the best time perhaps is on Easter Sunday when we are allowed to indulge after weeks of temporarily giving up rich food for Lent.

Torta
adapted from Market Manila's Torta recipe

1 cup buco juice or water
1 cup sugar
2 cups all-purpose flour
2 tablespoons baking powder
¾ teaspoon kosher salt
8 ounces unsalted butter, room temperature
12 egg yolks
8 ounces sweetened condensed milk
4 ounces whole milk
3 tablespoons olive oil
ensaimada molds, extra-large muffin pan, or tartlet molds
cupcake liners
  • In a small pan, heat juice and sugar until sugar dissolves; leave to cool to room temperature.
  • Line molds with paper liners, set aside.
  • Preheat oven to 350°F or 400°F.
  • In a medium bowl, whisk together flour, baking powder, and salt; set aside.
  • In the bowl of a standing mixer with paddle attachment, beat butter on medium-high until light and creamy. Add the egg yolks and beat until well-mixed. Add cooled syrup, both milk, and oil and beat well. Add flour mixture; beat on low until well incorporated. Fill molds 2/3 full and bake for 20 minutes at 350°F until tops are golden, or 12 minutes at 400°F until tops are golden brown.

Cebu Torta
a slight bump at the center if baked at 350°F


***********************************************************

KCC


Kulinarya was started by a group of Filipino foodies living in Sydney (Kath, Trisha, and Trissa), who are passionate about the Filipino culture and its colorful cuisine.

Each month we will showcase a new dish along with their family recipes. By sharing these recipes, we hope you find the same passion and love for Filipino Food as we do.

***********************************************************

But wait! There's more decadent Filipino fare to read here.

April 15, 2011

Food Friday: Matcha and Sweet Azuki Swirl Bread

Labels: , , , ,

Matcha and Azuki Swirl Bread


Food Friday


I've been busy updating and re-posting old entries from 2006 and 07. Back then I didn't add labels to my posts and sometimes even forgot the titles. Yeah, I know, I was the worst newbie blogger ever. And my photos were really ug-uh-leee and when I changed to the recent template design the positioning of the photos got messed up. I tell you, it's taking me forever "correcting" the photos' colors, brightness, etc., uploading to flickr, and aligning them on the posts. But the positive thing is I get to be reminded to bake my old favorites such as these swirl breads. I added a layer of green tea dough to the sweet bean swirl...perfect match-a. (^-^)

April 14, 2011

Daring Cooks: Edible Containers

Labels: , , , ,

Mac and Cheese on Cheese
Mac 'N' Cheese on a crispy cheddar cheese bowl


Potato Cups
baked hash potato cups with assorted fillings:
egg salad topped with caviar, poached salmon, goat cheese

vegetarian bibimbap with tofu, baby carrots, baby zucchini, soybean sprouts,
fresh shiitake, and egg yolk in a seasoned rice bowl


Renata of Testado, Provado & Aprovado! was our Daring Cooks’ April 2011 hostess. Renata challenged us to think “outside the plate” and create our own edible containers! Prizes are being awarded to the most creative edible container and filling, so vote on your favorite from April 17th to May 16th at http://thedaringkitchen.com!

This is one of the most fun Daring Cooks challenges and most delicious too. Thank you Renata for coming up with this brilliant challenge allowing us DC members to be as creative as much as we want.

THE RECIPES

Mac 'N' Cheese
I love the crunch and saltiness of the cheese bowls and what could be better than a double dose of cheese.

coarsely grated extra sharp Cheddar cheese
prepared macaroni and cheese, keep hot
1 tablespoon butter or olive oil
1 cup panko bread crumbs
medium-size bowls
cookie sheet lined with aluminum foil (for easy clean-up)
  • Heat a non-stick skillet over medium fire and place 3 tablespoons of grated cheese. Cook until golden brown and a little fat has been rendered. Remove fat by dabbing with paper towel. Remove cheese with a large spatula and place immediately onto the bottom of upside-down bowl. Place on the cookie sheet and let set while cooking the rest of the cheese. Once set, remove cheese cups carefully from bowl and set on a serving dish. Add butter or olive oil to the skillet and toast panko until golden brown. Spoon macaroni and cheese into cups and sprinkle with toasted panko. Serve immediately
Hash Potato Cups
I love these for breakfast.

1 pound waxy potatoes
¼ cup finely chopped sweet onion
1 tablespoon butter
1 teaspoon sea salt
egg salad
caviar
poached or shallow-fried salmon steak
goat cheese, cream cheese, or mascarpone
regular or mini muffin pan
  • Boil potatoes, whole and unpeeled, for 10 minutes. Let potatoes cool in the freezer for 15 minutes. Peel potatoes and coarsely grate. In a non-stick skillet, heat butter, saute onions until cooked, add to the grated potatoes with the salt, mix gently. Preheat oven to 425°F. Grease muffin cups. Spoon and press the potato mixture on the bottom and sides of muffin cups. Bake until darkish brown and edges are crispy. Remove from pans and fill.

Vegetarian Bibimbap
Korean cuisine has been a long-time favorite specially bibimbap I decided to make it vegetarian with tofu instead of beef strips for a change.

rice

2 cups cooked Japanese short grain rice
1 egg white
2 tablespoon sauce
2 medium-size microwavable bowls

sauce
6 tablespoons soy sauce
3 tablespoons gochu jang sauce, or to taste
3 tablespoons sugar
1 tablespoon ginger juice
1 garlic clove, minced
1 tablespoon toasted sesame seeds
1 tablespoon Korean sesame oil

vegetable and tofu
light olive oil
baby carrots, julienned
baby zucchini, sliced into coins
fresh shiitake, julienned or halved if small
kale or spinach
soybean sprouts
1 block firm tofu, cut into 1 x 1 x 2 inch pieces

optional topping
2 egg yolks
  • Mix all sauce ingredients and let simmer in a small saucepan for 3 minutes. Remove 2 tablespoons and mix with the rice together with egg white. Line the bowls with plastic wrap and spoon 1 cup rice in each bowl pressing up the sides. Microwave, uncovered for 1½ minutes. Leave to set.
  • In a non-stick skillet, add half tablespoon of oil and saute carrots until tender, transfer into a large plate and set aside. Saute the next 4 ingredients, one at a time, adding oil as needed and transfer into the plate separating each vegetable. Keep vegetables warm. Stir fry tofu with 2 tablespoons of sauce until sauce is absorbed and has thickened. Transfer into the platter; keep warm. Fry the egg yolks until the bottom is set and the edges begin to cook.
  • Reheat rice bowl in the microwave for 1 minute. Remove the plastic wrap carefully and transfer the rice bowls into plates. Arrange the still warm vegetables and tofu in the bowls. Drizzle sauce all over. Top each with an egg yolk. Serve immediately with extra sauce on the side.

April 12, 2011

Fluffy Egg White Omelet with Feta and Kale

Labels: , , , ,

Fluffy Egg White Omelet

I have lots and lots of egg whites, I'm practically swimming in them. I already used up some for meringues but didn't want to make any more sweet things that would probably add inches to my expanding waistline. Then I remembered the fluffy egg white omelet I made 2 years ago, so for early dinner I whipped up a light airy protein-rich omelet that is nowhere near boredom city because it's filled with farmer's white cheese, salty tangy herbed (basil, rosemary, dried tomato) feta cheese, and my current favorite green leaf vegetable, kale. I love the combination of the salty cheese and the nutty vegetable and will definitely have this for dinner again.

Fluffy Egg White Omelet
serves one

3 egg whites
1 teaspoon fresh lemon juice
1/8 teaspoon fine sea salt
1 tablespoon extra virgin olive oil or butter
½ cup chopped kale
2 tablespoons crumbled feta
2 tablespoons crumbled farmer's white cheese
  • In the bowl of standing mixer with wire whisk on medium speed, beat egg whites, lemon juice, and salt to soft peaks. In a large skillet, heat half tablespoon oil over medium heat and saute kale for 2 minutes or until soft. Transfer into a small plate. Add the rest of olive oil, then add beaten egg whites. Cook for 2 minutes. Flip the egg white and cook for 1½ minutes. Flip once more then sprinkle the cooked kale and cheeses evenly on top. Fold and transfer on a plate. Serve immediately.
Fluffy Egg White Omelet

 
Design by New WP Themes | Bloggerized by Lasantha - Premiumbloggertemplates.com