December 23, 2010

The Daring Bakers: Stollen

Labels: ,

Stollen
Stollen

The 2010 December Daring Bakers’ challenge was hosted by Penny of Sweet Sadie’s Baking. She chose to challenge Daring Bakers’ to make Stollen. She adapted a friend’s family recipe and combined it with information from friends, techniques from Peter Reinhart’s book.........and Martha Stewart’s demonstration.

Stollen is one of the regular Christmas goodies that we have in our house year after year for more than 20 years. This is the second year I have not bought them from the store since discovering homebaked is much much better.

For this challenge, we were given a choice of shaping it into a wreath. I baked a small batch of stollen a few days before the challenge was announced and they have been shaped into the usual rectangular cakes. I wanted to try this recipe and the wreath shape so I baked just half of the recipe. To view the complete recipe and instructions click here. A few changes I made: I used 2 tablespoons of sugar instead of half a cup, omitted the cinnamon and orange and lemon extracts, used almond flour instead of flaked, and added 1 more cup of dried fruits and candied peels. These are the fruits I used: golden and dark raisins, dried cranberries, dried tart cherries, and candied citron, lemon, and orange peels. I also used vanilla infused powdered sugar for the coating because I love the extra vanilla flavor. The fruit cake is very yummy and I can't wait for it to age for 1 week which is how I like stollen. And I always leave some slices on the kitchen counter for weeks until they are very very dry and crunchy, sort of like biscotti without baking them a second time. The crunchy stollen slices are very good for dunking on my morning coffee.

Stollen

These are the ones I made November 29, 2010 and last year both using Peter Reinhart's recipe from The Bread Baker's Apprentice.

Stollen
2010 Christmas stollen

Stollen
2009 Christmas stollen

December 19, 2010

Kulinarya Cooking Club: Homemade Food Gifts

Labels: , , , ,

Pan de Leche
Pan de Leche
pan de leche


KCC

Kulinarya was started by a group of Filipino foodies living in Sydney (Kath, Trisha, and Trissa), who are passionate about the Filipino culture and its colorful cuisine.

Each month we will showcase a new dish along with their family recipes. By sharing these recipes, we hope you find the same passion and love for Filipino Food as we do.

The December KCC theme is Homemade Food Gifts and our hosts are Joy and Maribel. Thank you ladies.

The easiest and most convenient for me would be either baked goods or candies and desserts. I chose to bake pan de leche (milk bread) and filled half of the dough balls with yema made with caramelized condensed milk and egg yolks and the other half I topped with chopped macapuno preserves. I didn't like any of the recipes I found online and adapted the pain au lait (milk bread) from ADVANCED BREAD AND PASTRY by Michel Suas. They are basically the same milk bread but Michel Suas' recipe has less sugar and eggs and the dough requires an overnight refrigeration producing delicious, soft, milky, and not too sweet [even with the addition of 1 more tablespoon of sugar]. They are perfect little rolls in a gift box that I believe anyone would love for breakfast on Christmas morning.

Pain au Lait/Pan de Leche

adapted from ADVANCED BREAD AND PASTRY

14½ ounces bread flour
6½ ounces warm (90°F) milk
2 eggs, room temperature
1½ ounces sugar, less or more to taste
2 teaspoons kosher salt
1¼ teaspoons instant yeast
5 ounces butter, room temperature
egg wash, optional
  • In the bowl of a standing mixer with the dough hook attached, mix all the ingredients except egg wash on first speed for 5 minutes. Increase to second speed and mix for 8 minutes. Transfer dough into a container, cover with plastic wrap and leave on the kitchen counter for 1 hour. Refrigerate overnight.
  • Remove dough from refrigerator and scale into 1½ ounce pieces, shape into balls, cover lightly, and let rest for 15 minutes. Flatten each ball and fill with half a tablespoon of preferred filling. Gather the edges and pinch to close. Place each filled ball seam-side down on paper-lined cupcake pans . Cover with plastic wrap and let rise for 1 hour to 1½ hours. Bake in a preheated 350°F oven for 20 to 25 minutes or until tops of the rolls are golden brown. These are best eaten while still warm. Rewarm leftover rolls in a preheated 325°F oven for 5 to 8 minutes.

Pan de Leche
top: filled with yema
bottom: topped with macapuno

December 16, 2010

Food Friday: Duck Soup

Labels: , , ,

Duck Soup

food friday chiclet

We had our first snowfall of the season today. It's very light though, accumulation is only 2 inches but it's very very cold, as in below freezing. Brrrr! It's time for an easy to make steaming hot duck soup. I had several cups of duck broth and added to it a little of the duck meat, scallions, cubed tofu, sliced snow peas, ginger, rice wine, dried shiitake mushrooms, sea salt, and soy sauce. Very yummy, and together with hot freshly brewed loose jasmine tea leaves, I'm now warm, toasty, and ready to watch Duck Soup.:D

Light Snow

December 14, 2010

The Daring Cooks Poach to Perfection

Labels: , ,

Poached Egg On Brioche

Jenn from Jenn Cuisine and Jill (jillouci) have challenged The Daring Cooks to learn to perfect the technique of poaching an egg. They chose Eggs Benedict recipe from Alton Brown, Oeufs en Meurette from Cooking with Wine by Anne Willan, and Homemade Sundried Tomato & Pine Nut Seitan Sausages (poached) courtesy of Trudy of Veggie num num.

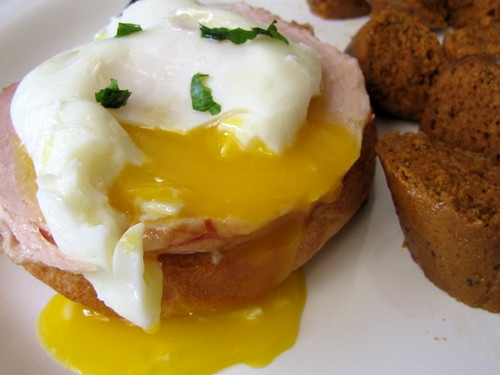
Thank you Jenn and Jill for choosing this wonderful challenge. I love eggs, specially fried sunny-side-up with runny yolks. I also like poached eggs but it's too much work and I tend to lose a lot of the whites during cooking resulting in a much smaller egg which means less protein. For this challenge, I poached just one egg according to the recipe and the smallish egg reminded me why I bought an egg-poaching pan many years ago which has an insert [with several nonstick cups] that sits on the simmering water in the pan without the eggs touching the water. This way you cook perfectly poached eggs with all the whites intact.

Seitan Sausage

Well anyway, I had the egg on top of a toasted thick slice of brioche and a slice of home cured pork belly ham but did not top it with hollandaise sauce. I sprinkled the egg with sea salt and chopped Italian parsley and had it with slices of the yummy seitan sausage. My sausages are not perfect because they're a bit soft rather than chewy which is how I like seitan sausages but the flavor is fantastic. I'll make them again and will use less liquid; I'm also inspired and will be making Spanish seitan chorizos later this week.

Homemade Sun-dried Tomato And Pine Nut Seitan Sausages
¼ cup pine nuts, toasted
½ of a red onion, diced
1 red chili, chopped
1 cup whole sun-dried tomatoes
¼ cup olive oil
1 cup vegetable stock
2 tablespoons tomato paste
2½ cups vital wheat gluten
1 teaspoon dried thyme
1 teaspoon paprika

for the poaching liquid:
6 cups vegetable stock
3 garlic cloves
2 bay leaves

cheesecloth to wrap the sausages
  • Place 6 cups of stock, the garlic cloves, and the bay leaves in a deep sauté pan or stock pot. Heat on medium.
  • In a food processor finely mince the toasted pine nuts, red onion, chili, and sun-dried tomatoes. Add the vital wheat gluten, dried thyme and paprika to the pine nut mixture and process till combined. In a measuring bowl, whisk the stock with the tomato paste and olive oil. Slowly add to the vital wheat gluten mixture and pulse until you have a smooth dough. You probably will not need all the liquid. Start with ¾ cups of the liquid and add more if needed. Whatever liquid you have left can be added to the poaching liquid.
  • Divide the dough into 10 portions and shape into 6-inch sausages. Wrap each section tightly in cheesecloth and tie off the ends with twine.
  • If the poaching liquid is not yet boiling, turn up the heat until it does. Add the sausages and turn the heat down to a simmer. Simmer gently for 45–50 minutes, or until the sausages are firm. Remove the sausages from the poaching liquid (reserve the liquid if you don’t plan on eating all the sausages immediately). Allow the sausages to cool a little and gently unwrap. These may be refrigerated in their poaching liquid for a week.

Click here to view more Daring Cooks Poached to Perfection

 
Design by New WP Themes | Bloggerized by Lasantha - Premiumbloggertemplates.com