August 4, 2011

Light Chocolate Cupcakes Topped with Sponge Candy

Labels: , , ,

Chocolate Cupcake with Raw Sugar Frosting
Chocolate Cupcake
light chocolate cupcakes with raw sugar frosting 
and topped with bits of sponge candy

Food Friday

It's been ages since I made chocolate cupcakes. I have small bits of sponge candy, also called honeycomb because of its open fluffy texture, and thought they would be great as topping for chocolate cupcakes. I wasn't in the mood for the too rich dark ones so I used natural cocoa powder for lighter but still chocolaty cakes. I love the crunch and extra sweetness of the sponge candy, perfect with the soft melt-in-your mouth cupcakes. If you prefer really dark moist rich cakes the recipe is here

Light Chocolate Cupcakes
2 cups all-purpose flour
½ cup natural cocoa powder (not Dutch processed)
1 teaspoon baking powder
½ teaspoon baking soda
¾ cup room temperature butter
1½ cups sugar
1 tablespoon vanilla extract
3 eggs, separated
1 cup ice-cold water
  • Line cupcake tins with baking papers. 
  • Preheat oven to 350°F. 
  • In a medium bowl, whisk together flour, cocoa powder, baking powder, and baking soda; set aside. 
  • In the bowl of a standing mixer with the paddle attachment, beat butter for 1 minute; add sugar and vanilla and beat on high until light and fluffy. Add egg yolks, one at a time, beating each time until just incorporated.
  • Add flour mixture alternately with water, beating until smooth. Transfer mixture into a bowl; set aside. 
  • Wash the bowl thoroughly. With wire whisk, beat egg whites until stiff and glossy. Mix a little of the egg whites into the flour mixture to lighten. Fold the rest of the egg whites into the flour mixture. Spoon about ¼ cup of dough into each cup. Bake for 15 to 20 minutes or until cake test is done. Cool completely before frosting.
Golden Raw Sugar Frosting
1 cup coarse golden raw sugar
1/3 cup water
1 tablespoon vanilla extract
2 egg whites
¼ teaspoon cream of tartar
  • In a small bowl, heat sugar and water until sugar dissolves. Bring to a boil until bubbly; turn heat off.
  • In the bowl of a standing mixer with wire beater, beat egg whites and cream of tartar to soft peaks; slowly add hot syrup while beating on high speed until frosting is thick and satiny.

July 30, 2011

Salmon Head Sinigang sa Bayabas

Labels: , , ,


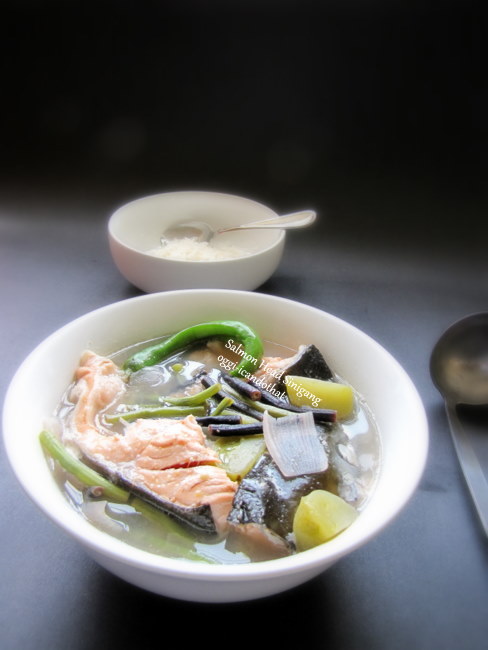
Salmon Head Sinigang
salmon head, green tomatoes, and yardlong beans in guava broth

Sinigang, the Filipino soup which can be very sour or just slightly sour, is Kulinarya Cooking Club theme for this hot hot month of July. Initially, I was not too enthusiastic; first, because of the heat wave we are having here in the US East coast, and second, although I love sinigang and know by heart how to cook almost all sinigang recipes without using the packaged stuff, unfortunately my family doesn't care for it. After thinking if I should prepare sinigang or skip the challenge, I felt it's no big deal to sweat a little and made a small bowl for KCC and for me, of course, because the last time I had was in 2009 and before that was about 20 years ago. This is only the third time I've cooked sinigang.

Sinigang sa Bayabas (Soup in Guava Broth) was my favorite. My mom used to add a little bit of sugar and she didn't make it too sour either. Her choice of fish was usually milkfish or white kanduli (cream dory?), and occasionally she prepared the soup with thin strips of beef. What I like about sinigang is that I don't have to follow an exact recipe, I just put in whatever souring agent, meat, and vegetables I prefer and season it to suit my taste. I am so glad I made the soup because I really loved the combination of ripe guavas and salmon head, and the green tomatoes and sitaw straight from my garden made the soup a real treat. I had the soup spooned over a mound of hot steamed rice just the way I like. It was delicious and I didn't notice if I perspired while eating. ^_^

Salmon Head in Guava Broth
6 pieces medium size ripe Philippine guavas
4 cups water, divided
1 medium onion, coarsely chopped
4 green tomatoes, quartered
2 cups yardlong beans, cut into 2 inch pieces
2 tablespoons lemon juice, more or less to taste
1 tablespoon fish extract, plus extra for drizzling
salt to taste
2 tablespoons sugar, more or less to taste
1 salmon head, cut into serving pieces
2 hot green finger peppers
  • Cut each guava into 8 pieces. Place in a medium saucepan with 2 cups of water. Bring to a boil, cover, and let simmer for 30 minutes or until guavas are very soft and mushy. Strain and press as much pulp through a very fine sieve over a larger saucepan. Discard the seeds and guava pulp that remains in the sieve.
  • Add the rest of the water and onions to the saucepan and simmer, covered, for 10 minutes. Add the next 6 ingredients and gently boil for 5 minutes or until yardlong beans are half cooked. Add salmon head and green peppers; simmer, uncovered, for 3 to 4 minutes or until salmon is fully cooked. Serve over hot rice drizzled with fish extract, if desired.


Please visit the blogs of my fellow KCC members for delicious sinigang preparations. 

***********************************************************
KCC

Kulinarya was started by a group of Filipino foodies living in Sydney (Kath, Trisha, and Trissa), who are passionate about the Filipino culture and its colorful cuisine.

Each month we will showcase a new dish along with their family recipes. By sharing these recipes, we hope you find the same passion and love for Filipino Food as we do.

***********************************************************

July 29, 2011

Food Friday: Soft Mango Yogurt Ice Cream

Labels: , , ,

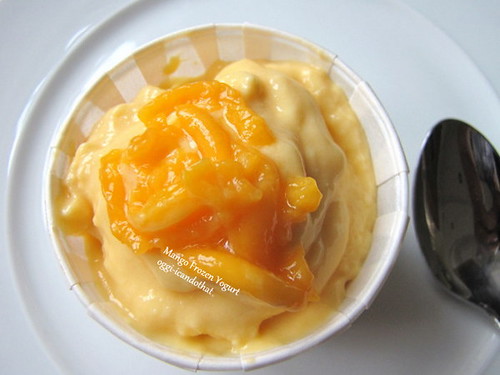
Mango Frozen Yogurt


The oppressive summer heat has been with us for a month now and I feel like melting whenever I step out of the house. What could be better than a cup of almost frozen tangy mango and yogurt dessert. [Okay, maybe a plunge in a pool of ice cold water would be a relief but iced desserts are good enough.] Anyway, I prefer this ice cream semi frozen because it retains its creaminess and doesn't give me brain freeze.:)

Semi Frozen Mango Yogurt Ice Cream
2 cups Greek-style yogurt
1 cup chopped fresh mango
4 to 6 tablespoons sugar
  • Blend all ingredients in a blender or food processor until smooth. Transfer into a container and place in the freezer for 30 minutes to 1 hour. Blend with a hand blender or in a blender and return to the freezer for another 30 to 45 minutes. Stir with a spatula and serve semi frozen. Or process in an ice cream maker and serve immediately. If you can't find Greek-style yogurt, strain regular yogurt in a strainer lined with a round coffee filter set on top of a bowl until yogurt is very thick.

July 27, 2011

Laminated Brioche

Labels: , ,

Laminated Brioche
Laminated Brioche
laminated brioche swirls filled with chopped candied figs

I've been eyeing Laminated Brioche since I bought ADVANCED BREAD AND PASTRY by Michel Suas but have been apprehensive I might fail. I finally baked them yesterday, the whole process took 2 days starting early morning the first day and finished baking late afternoon the second day. It actually takes 3 days but I'm impatient and I started reeeaaally early in the morning to be able to finish the next day.

It was a semi success as you can see from the crumb. There are layers visible but the honeycomb-like layers that I was expecting are missing. I'll surely make them again until I perfect the laminating process for a better looking layered crumb. The rolls are good enough for me at this time as they are delicious and not too rich; the crust is super flaky and the crumb is light, airy, and buttery but not greasy. The recipe surprisingly does not have much butter, only a total of 10½ ounces to 16 ounces of bread flour. For the butter block I followed another method because it makes the butter more pliable than just pounding on the sticks to flatten them.

Tip: For doughs with higher sugar content it's best to use the appropriate instant yeast such as SAF Gold. The dough will rise better when you use this type of yeast.

Laminated Brioche
adapted from ADVANCED BREAD AND PASTRY by Michel Suas

sponge
3 ounces bread flour
1/8 teaspoon instant yeast
2 ounces water
  • Mix all ingredients until smooth. Place in a container, cover with plastic wrap, and leave on the kitchen counter for 12 hours.
final dough
13 ounces bread flour
5 whole eggs
¾ ounce water
2 ounces sugar
1½ teaspoons kosher salt
2¼ teaspoons SAF Gold instant yeast
2½ ounces butter, room temperature
sponge
  • Mix all ingredients in a standing mixer with dough hook attachment. Knead on medium high for 10 minutes. Transfer into a lightly buttered container, cover with plastic wrap and lid, and leave on the kitchen counter for 1 hour. Retard in the refrigerator overnight or for 15 hours.
butter block
8 ounces cold butter
1 tablespoon all-purpose flour
  • Cut butter into ½ inch slices and place in the bowl of a standing mixer. Sprinkle the flour and beat on low with the paddle attachment until combined, scraping down the sides as needed. The butter should still be cold. Transfer the butter mixture onto a large piece of plastic wrap and shape into a 6-inch square. Refrigerate until needed. 
laminated brioche
final dough
butter block
all-purpose flour
chopped candied figs, dried currants and sugar, or almond cream
1 beaten egg
  • Dust the surface lightly with flour. Remove the dough from refrigerator and roll into a 12 x 6-inch rectangle. Place the butter block in the middle and bring both sides to the middle covering the butter entirely. Lightly tap the dough with a rolling pin starting from the center out and roll into a 16 x 9-inch rectangle. Fold 1/3 of the dough over 2/3 of the dough and fold the rest over like a letter. Wrap in plastic wrap and refrigerate for 30 to 45 minutes. Repeat 3 more times, resting in the refrigerator each time.
  • Roll out the dough into 16-inch wide and 1/8 inch thin rectangle. Brush one edge with water, 1 inch wide. Sprinkle with currants and dust lightly with sugar; or spread a thin layer of almond cream, leaving the part brushed with water. Roll from the unwatered side and cut into 1 inch wide strips. Place on parchment-lined sheet pans, tucking the outer end of the strip underneath the center of the swirl. Brush top and sides of swirls with egg wash, lightly cover with plastic wrap and leave to proof for 1½ to 2 hours preferably in a humid place. Brush top and sides of swirls a second time and bake in a preheated 400°F oven for 15 minutes or until golden brown all over.


Design by New WP Themes | Bloggerized by Lasantha - Premiumbloggertemplates.com