April 27, 2011

Daring Bakers: Maple Mousse In An Edible Container

Labels: , , , ,

Maple Mousse in Candied Bacon
maple mousse in candied bacon topped with chocolate meringue


Maple Mousse in Lemon Rind Confit
maple mousse in lemon rind confit topped with ginger-flavored meringue


Maple Mousse in Chocolate Boat
chocolate boat, split tiny banana, semi-frozen maple mousse,
sweet cream, cherry

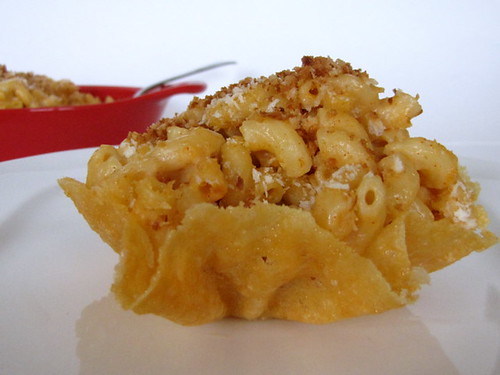
The April 2011 Daring Bakers’ challenge was hosted by Evelyne of the blog Cheap Ethnic Eatz. Evelyne chose to challenge everyone to make a maple mousse in an edible container. Prizes are being awarded to the most creative edible container and filling, so vote on your favorite from April 27th to May 27th at http://thedaringkitchen.com!


The edible containers theme continues with this month's Daring Bakers. Thanks Evelyne for allowing us to choose our containers for the light, airy, and delicious maple mousse.

Maple Syrup Mousse
1 cup pure maple syrup
4 large egg yolks
1 tablespoon unflavored gelatin
1 ½ cups whipping cream (35% fat content)
  • Bring maple syrup to a boil then remove from heat. In a large bowl, whisk egg yolks and pour a little bit of the maple syrup while whisking to temper the yolks. Add warmed egg yolks to hot maple syrup until well mixed. Measure ¼ cup of whipping cream in a bowl and sprinkle the gelatin. Let it rest for 5 minutes. Place the bowl on top of a pan of barely simmering water, stir to ensure the gelatin has completely dissolved. Whisk the gelatin mixture into the maple syrup mixture and set aside. Whisk occasionally for approximately an hour or until the mixture has the consistency of an unbeaten raw egg white. Whip the remaining cream. Stir ¼ of the whipped cream into the maple syrup mixture. Fold in the remaining cream and refrigerate for at least an hour. Remove from the fridge and divide equally among your edible containers.
One of Evelyne's suggestions for containers is crispy bacon cups. I made them sweet and extra crunchy by dipping them in raw sugar before baking. I have candied bacon before and loved them as a snack but never tried it with ice cream or mousse. The crunchy bacon combined with maple mousse and chocolate meringue is heavenly.

Candied Bacon Cups
strips of bacon
golden raw or light brown sugar
  • Snip bacon strips on both sides and dip in sugar. Form into coils and place in muffin cups. Bake in a 400°F oven until edges and bottom are dark brown. Leave for a minute in cups to cool and set slightly. Transfer on a plate with paper towel to remove excess grease. Let cool completely on a wire rack before filling with mousse.

I had a few lemon rind confit in the refrigerator and thought the tangy, slightly bitter, and sweet rinds would be perfect containers for the mousse. I added a pinch of ground ginger to half of the meringue recipe and the ginger flavor is just about right, not too weak nor strong. I love this combination too.

Lemon Rind Confit
14 ounces sugar
6 ounces glucose
12 ounces water
4 lemons, cut in half crosswise
water
  • Heat sugar, glucose, and water until sugar dissolves. Let cool.
  • Juice lemons, keep juice for another use. Scrape and clean the insides of the lemon rinds leaving the white pith on. Boil water and add rinds; boil for half a minute then drain. Boil and drain 4 more times with fresh water each time.
  • Bring the syrup to a boil in a pot. Add the blanched rinds and let simmer for 1 hour, making sure the syrup does not boil and completely covers the rinds. Turn heat off and let rinds cool in the syrup. Transfer to a container, cover tightly and refrigerate until needed.
  • Trim the bottom if using as a container for mousse or ice cream.

April 17, 2011

Cebu Torta

Labels: , , , ,

Cebu Torta
Cebu Torta


I'm so glad Kat and Lala, our Kulinarya Cooking Club hosts chose Decadence for April 2011 because I've been itching to make Cebu Torta for a few years now but never had the courage to make them...they're too darn rich for my own good. Reading the amount of egg yolks alone is enough to give me heart palpitations. Cebu torta as described on many websites sounds like the love child of this extra-rich Filipino ensaimada and leche flan...let's see...

large number of egg yolks ✓
loads of lard or butter ✓
tons of sugar ✓
sweetened condensed milk ✓

I made a very small batch following the traditional recipe, replacing tuba (coconut toddy) with sweet wine and a pinch of yeast; the torta was a bit acidic and not very good but still edible. It's probably my fault for adding yeast and letting it ferment longer than necessary. I baked a second torta adapting Market Manila's recipe which uses baking powder as leavening. I used buco juice in place of water and baked one half of the dough in large muffin pans at 350°F which produced dense cakes with a slight bump at the center. The other half of the dough was baked in small shallow tartlet molds in a hotter oven. They came out less dense, not fluffy, just a tad airier than the large ones. I love them both. These cakes are super rich, sweet, moist, and may be addicting (not good). Torta spells D-E-C-A-D-E-N-T and should be consumed only once a year, the best time perhaps is on Easter Sunday when we are allowed to indulge after weeks of temporarily giving up rich food for Lent.

Torta
adapted from Market Manila's Torta recipe

1 cup buco juice or water
1 cup sugar
2 cups all-purpose flour
2 tablespoons baking powder
¾ teaspoon kosher salt
8 ounces unsalted butter, room temperature
12 egg yolks
8 ounces sweetened condensed milk
4 ounces whole milk
3 tablespoons olive oil
ensaimada molds, extra-large muffin pan, or tartlet molds
cupcake liners
  • In a small pan, heat juice and sugar until sugar dissolves; leave to cool to room temperature.
  • Line molds with paper liners, set aside.
  • Preheat oven to 350°F or 400°F.
  • In a medium bowl, whisk together flour, baking powder, and salt; set aside.
  • In the bowl of a standing mixer with paddle attachment, beat butter on medium-high until light and creamy. Add the egg yolks and beat until well-mixed. Add cooled syrup, both milk, and oil and beat well. Add flour mixture; beat on low until well incorporated. Fill molds 2/3 full and bake for 20 minutes at 350°F until tops are golden, or 12 minutes at 400°F until tops are golden brown.

Cebu Torta
a slight bump at the center if baked at 350°F


***********************************************************

KCC


Kulinarya was started by a group of Filipino foodies living in Sydney (Kath, Trisha, and Trissa), who are passionate about the Filipino culture and its colorful cuisine.

Each month we will showcase a new dish along with their family recipes. By sharing these recipes, we hope you find the same passion and love for Filipino Food as we do.

***********************************************************

But wait! There's more decadent Filipino fare to read here.

April 15, 2011

Food Friday: Matcha and Sweet Azuki Swirl Bread

Labels: , , , ,

Matcha and Azuki Swirl Bread


Food Friday


I've been busy updating and re-posting old entries from 2006 and 07. Back then I didn't add labels to my posts and sometimes even forgot the titles. Yeah, I know, I was the worst newbie blogger ever. And my photos were really ug-uh-leee and when I changed to the recent template design the positioning of the photos got messed up. I tell you, it's taking me forever "correcting" the photos' colors, brightness, etc., uploading to flickr, and aligning them on the posts. But the positive thing is I get to be reminded to bake my old favorites such as these swirl breads. I added a layer of green tea dough to the sweet bean swirl...perfect match-a. (^-^)

April 14, 2011

Daring Cooks: Edible Containers

Labels: , , , ,

Mac and Cheese on Cheese
Mac 'N' Cheese on a crispy cheddar cheese bowl


Potato Cups
baked hash potato cups with assorted fillings:
egg salad topped with caviar, poached salmon, goat cheese

vegetarian bibimbap with tofu, baby carrots, baby zucchini, soybean sprouts,
fresh shiitake, and egg yolk in a seasoned rice bowl


Renata of Testado, Provado & Aprovado! was our Daring Cooks’ April 2011 hostess. Renata challenged us to think “outside the plate” and create our own edible containers! Prizes are being awarded to the most creative edible container and filling, so vote on your favorite from April 17th to May 16th at http://thedaringkitchen.com!

This is one of the most fun Daring Cooks challenges and most delicious too. Thank you Renata for coming up with this brilliant challenge allowing us DC members to be as creative as much as we want.

THE RECIPES

Mac 'N' Cheese
I love the crunch and saltiness of the cheese bowls and what could be better than a double dose of cheese.

coarsely grated extra sharp Cheddar cheese
prepared macaroni and cheese, keep hot
1 tablespoon butter or olive oil
1 cup panko bread crumbs
medium-size bowls
cookie sheet lined with aluminum foil (for easy clean-up)
  • Heat a non-stick skillet over medium fire and place 3 tablespoons of grated cheese. Cook until golden brown and a little fat has been rendered. Remove fat by dabbing with paper towel. Remove cheese with a large spatula and place immediately onto the bottom of upside-down bowl. Place on the cookie sheet and let set while cooking the rest of the cheese. Once set, remove cheese cups carefully from bowl and set on a serving dish. Add butter or olive oil to the skillet and toast panko until golden brown. Spoon macaroni and cheese into cups and sprinkle with toasted panko. Serve immediately
Hash Potato Cups
I love these for breakfast.

1 pound waxy potatoes
¼ cup finely chopped sweet onion
1 tablespoon butter
1 teaspoon sea salt
egg salad
caviar
poached or shallow-fried salmon steak
goat cheese, cream cheese, or mascarpone
regular or mini muffin pan
  • Boil potatoes, whole and unpeeled, for 10 minutes. Let potatoes cool in the freezer for 15 minutes. Peel potatoes and coarsely grate. In a non-stick skillet, heat butter, saute onions until cooked, add to the grated potatoes with the salt, mix gently. Preheat oven to 425°F. Grease muffin cups. Spoon and press the potato mixture on the bottom and sides of muffin cups. Bake until darkish brown and edges are crispy. Remove from pans and fill.

Vegetarian Bibimbap
Korean cuisine has been a long-time favorite specially bibimbap I decided to make it vegetarian with tofu instead of beef strips for a change.

rice

2 cups cooked Japanese short grain rice
1 egg white
2 tablespoon sauce
2 medium-size microwavable bowls

sauce
6 tablespoons soy sauce
3 tablespoons gochu jang sauce, or to taste
3 tablespoons sugar
1 tablespoon ginger juice
1 garlic clove, minced
1 tablespoon toasted sesame seeds
1 tablespoon Korean sesame oil

vegetable and tofu
light olive oil
baby carrots, julienned
baby zucchini, sliced into coins
fresh shiitake, julienned or halved if small
kale or spinach
soybean sprouts
1 block firm tofu, cut into 1 x 1 x 2 inch pieces

optional topping
2 egg yolks
  • Mix all sauce ingredients and let simmer in a small saucepan for 3 minutes. Remove 2 tablespoons and mix with the rice together with egg white. Line the bowls with plastic wrap and spoon 1 cup rice in each bowl pressing up the sides. Microwave, uncovered for 1½ minutes. Leave to set.
  • In a non-stick skillet, add half tablespoon of oil and saute carrots until tender, transfer into a large plate and set aside. Saute the next 4 ingredients, one at a time, adding oil as needed and transfer into the plate separating each vegetable. Keep vegetables warm. Stir fry tofu with 2 tablespoons of sauce until sauce is absorbed and has thickened. Transfer into the platter; keep warm. Fry the egg yolks until the bottom is set and the edges begin to cook.
  • Reheat rice bowl in the microwave for 1 minute. Remove the plastic wrap carefully and transfer the rice bowls into plates. Arrange the still warm vegetables and tofu in the bowls. Drizzle sauce all over. Top each with an egg yolk. Serve immediately with extra sauce on the side.

 
Design by New WP Themes | Bloggerized by Lasantha - Premiumbloggertemplates.com